If you’ve highly pricy taste though a bit of spending funds, select Delta bathroom faucets to increase the decor of the bathroom of yours. Bathroom faucets may be discovered in a selection of designs, forms, and even styles. This means you’ll need to buck up and spend the money you have to have invested in the very first place on a quality faucet.
Here are Images about Kohler Bathroom Faucet Repair Diagram
Kohler Bathroom Faucet Repair Diagram

These revolutionary foot bath faucets imitate the action of a waterfall thanks to a single lever mechanism that delivers simultaneously hot and cold water. It is recommended however you decide on a faucet in accordance to the sink of yours as well as bath design. These will use a ceramic cartridge and disc and also seem to be the widely used choice for the bathroom faucet and tub & shower uses.
Replace Valvet Service Kit Instructions u2013 KOHLER

The utilization of best accessories to produce stylish and superb bathroom concept might be beneficial to put into reality the ideal bathroom design; and among these very best accessories stands out as the bathroom faucet. If you are going for an antique appearance and have furnishings like a a claw foot tub there’s nothing that will suit the bathroom of yours better then an oil rubbed bronze faucet.
Images Related to Kohler Bathroom Faucet Repair Diagram
Kohler Single-Control Lavatory Faucet K-12181
A single handle will allow you to correct the water temperature by setting the handle in the appropriate path for hot and cold. In case you have holes drilled for hot shower faucet handles, you may wish to rule out buying a single handle faucet unless you want to redo the tiles too. They help us to start our day great and clean.
Bathroom Sink Faucet Diagram You can see the different home

Kohler Widespread Lavatory Faucet K-454-4S eReplacementParts.com
Kohler bathroom faucet leak Terry Love Plumbing Advice u0026 Remodel
Replace the Valve in a Two Handle Faucet u2013 KOHLER

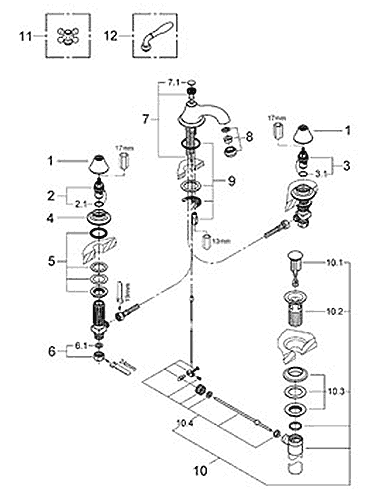
Parts for Grohe Seabury Series Vintage Designer Bath Fixtures
Replace the Valve in a Two Handle Faucet u2013 KOHLER

Replace the Valve in a Two Handle Faucet u2013 KOHLER

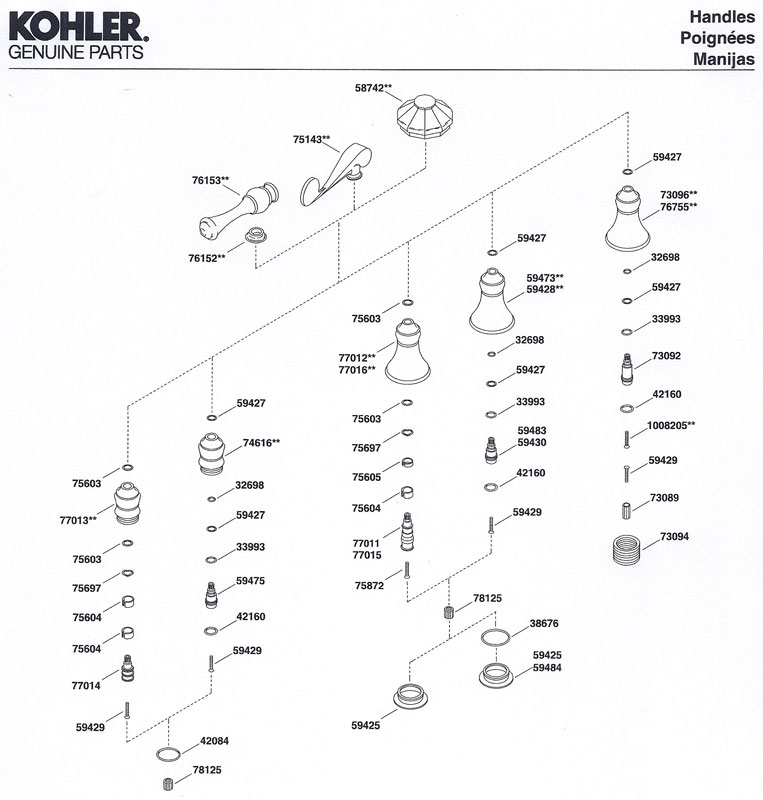
Maintenance u0026 Replacement Parts KOHLER
u0026$PartLanding$)
Kohler Kitchen Sink Faucet K-10430 eReplacementParts.com
KOHLER Tub/Shower Cartridge Repair Kit Kohler in the Faucet Repair

Bridge Kitchen Sink Faucets – Diverter Replacement u2013 KOHLER

Related articles:
- Kohler Bathroom Faucet Single Lever
- Brushed Nickel Bathroom Faucets Widespread
- Bathroom Faucets Kansas City
- Bathroom Faucet Adapter
- Delta Bathroom Faucet Handle Replacement Parts
- Contemporary Bathroom Faucet Single Handle
- Bathroom Faucet Replacement Cost
- Kohler July Bathroom Faucet
- Price Pfister Parisa Bathroom Faucet
- Replace American Standard Bathroom Faucet Cartridge
Kohler Bathroom Faucet Repair Diagram: A Comprehensive Guide
Repairing a Kohler bathroom faucet can be an intimidating task. However, with the right tools and knowledge, it can be done quickly and easily. This guide will provide you with a comprehensive Kohler bathroom faucet repair diagram and instructions to get your faucet up and running in no time.
Step by Step Process of Repairing a Kohler Bathroom Faucet
The first step in repairing a Kohler bathroom faucet is to identify the type of Kohler faucet you have. There are many different models available, ranging from classic designs to contemporary styles. Once you’ve identified the type of faucet you have, you can then begin the repair process.
The next step is to obtain the necessary tools and supplies for the job. You will need a flat-head screwdriver, adjustable wrench, pliers, Phillips screwdriver, and replacement parts for your particular model of Kohler faucet. It’s also important to read through the manufacturer’s instructions before beginning any repair work. This will ensure that you follow the proper steps for successfully repairing your Kohler bathroom faucet.
Once you have all of the necessary tools and supplies on hand, you can begin disassembling your Kohler bathroom faucet. To do this, remove the handle from the faucet body by unscrewing it with a Phillips screwdriver. Then, use an adjustable wrench to loosen any screws or nuts that hold the cartridge stem in place. After this is removed, carefully take out the cartridge stem from its housing in the base of the faucet.
Now that you have access to all of the internal components of your Kohler bathroom faucet, it’s time to begin replacing any worn or damaged parts. Referring to your Kohler bathroom faucet repair diagram will help guide you through this process. Start by removing any old O-rings or washers from their places on the cartridge stem and replace them with new ones provided in your repair kit. Next, use a flat-head screwdriver to remove any remaining screws or nuts holding together components such as springs or levers inside of the valve body. With these loose components removed, you can now replace them with new pieces provided in your kit. Finally, reassemble everything back into the valve body in its original order and secure it with screws or nuts if applicable.
At this point, your Kohler bathroom faucet should be fully restored and ready for use! If there are any remaining issues with your faucet after following these steps, refer back to your Kohler bathroom faucet repair diagram for further instruction or seek professional help if needed.
FAQs about Repairing a Kohler Bathroom Faucet
Q: How do I know which type of Kohler bathroom faucets I have?
A: To determine which type of Kohler bathroom faucets you have, look at its design and features as well as its model number printed on either side of its handle or spout base. Alternatively, you can visit their website where they list all their available models along with their specifications for easy identification.
Q: What tools do I need for repairing a Kohler bathroom faucet?
A: The tools required for repairing a Kohler bathroom faucet include a flat-head screwdriver, adjustable wrench, Phillips screwdriver, pliers, and replacement parts specific to your model of Kohler faucets such as O-rings and washers provided in most repair kits available online or at hardware stores.
Q: Can I attempt repairs without referring to a repair diagram?
A: While it is possible to attempt repairs without referring to a repair diagram, it is not recommended as some steps may be missed which could lead to further damage or even injury if done incorrectly. It is best practice to always refer back to manufacturer’s instructions when attempting any repairs on any type of plumbing fixture including those from Kohler as they provide detailed information on what steps need to be taken for successful repairs as well as what precautions should Be taken to avoid injury.
What tools are needed for Kohler bathroom faucet repair?
1. Adjustable wrench
2. Flat-head screwdriver
3. Phillips-head screwdriver
4. Pliers
5. Replacement parts for the faucet (O-rings, washers, valves, etc.)
6. Replacement tools (rubber gloves, pipe wrench, etc.)
7. Tubing cutter or hacksaw
8. A bucket or container for collecting water And debris
9. A Kohler bathroom faucet repair diagram for reference
What is the best way to repair a Kohler bathroom faucet?
The best way to repair a Kohler bathroom faucet is to first identify the issue and source of the problem. Depending on the issue, this could include replacing worn or damaged parts, tightening loose connections, replacing O-rings and gaskets, or cleaning/lubricating moving parts. If you are not comfortable with doing these repairs yourself, it is recommended that you contact a professional plumber for assistance.