Installing a bathroom faucet can be a rewarding DIY project that enhances the functionality and aesthetics of your bathroom. Before beginning the installation process, it’s crucial to gather the necessary tools and materials. These typically include an adjustable wrench, plumber’s tape, a basin wrench, silicone sealant, and the new faucet kit. Additionally, ensure that the water supply to the bathroom is turned off to prevent any leaks or accidents during the installation.
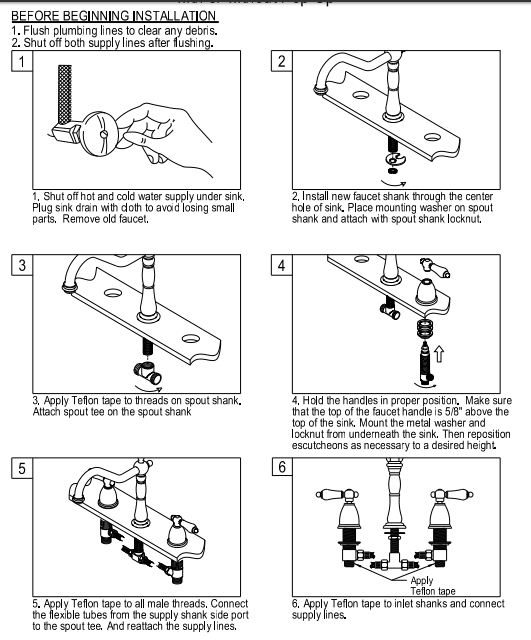
The first step in installing a bathroom faucet is to remove the old faucet, if applicable. This involves shutting off the water supply to the faucet, disconnecting the water lines, and loosening the nuts that secure the faucet to the sink or countertop. A basin wrench is often helpful for reaching tight spaces and loosening these nuts. Once the old faucet is removed, clean the area thoroughly to prepare it for the installation of the new faucet.
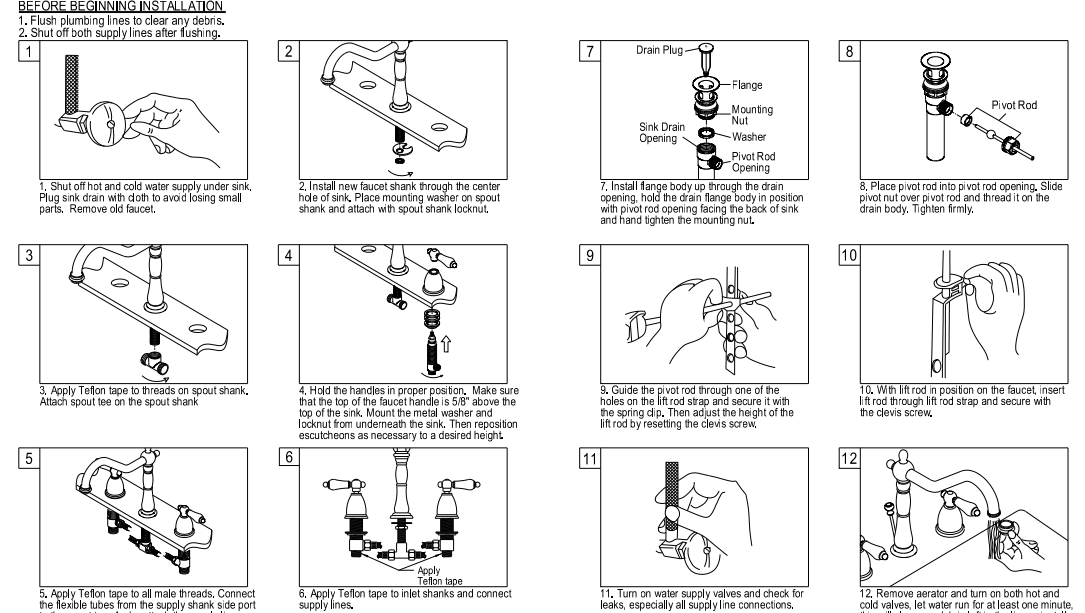
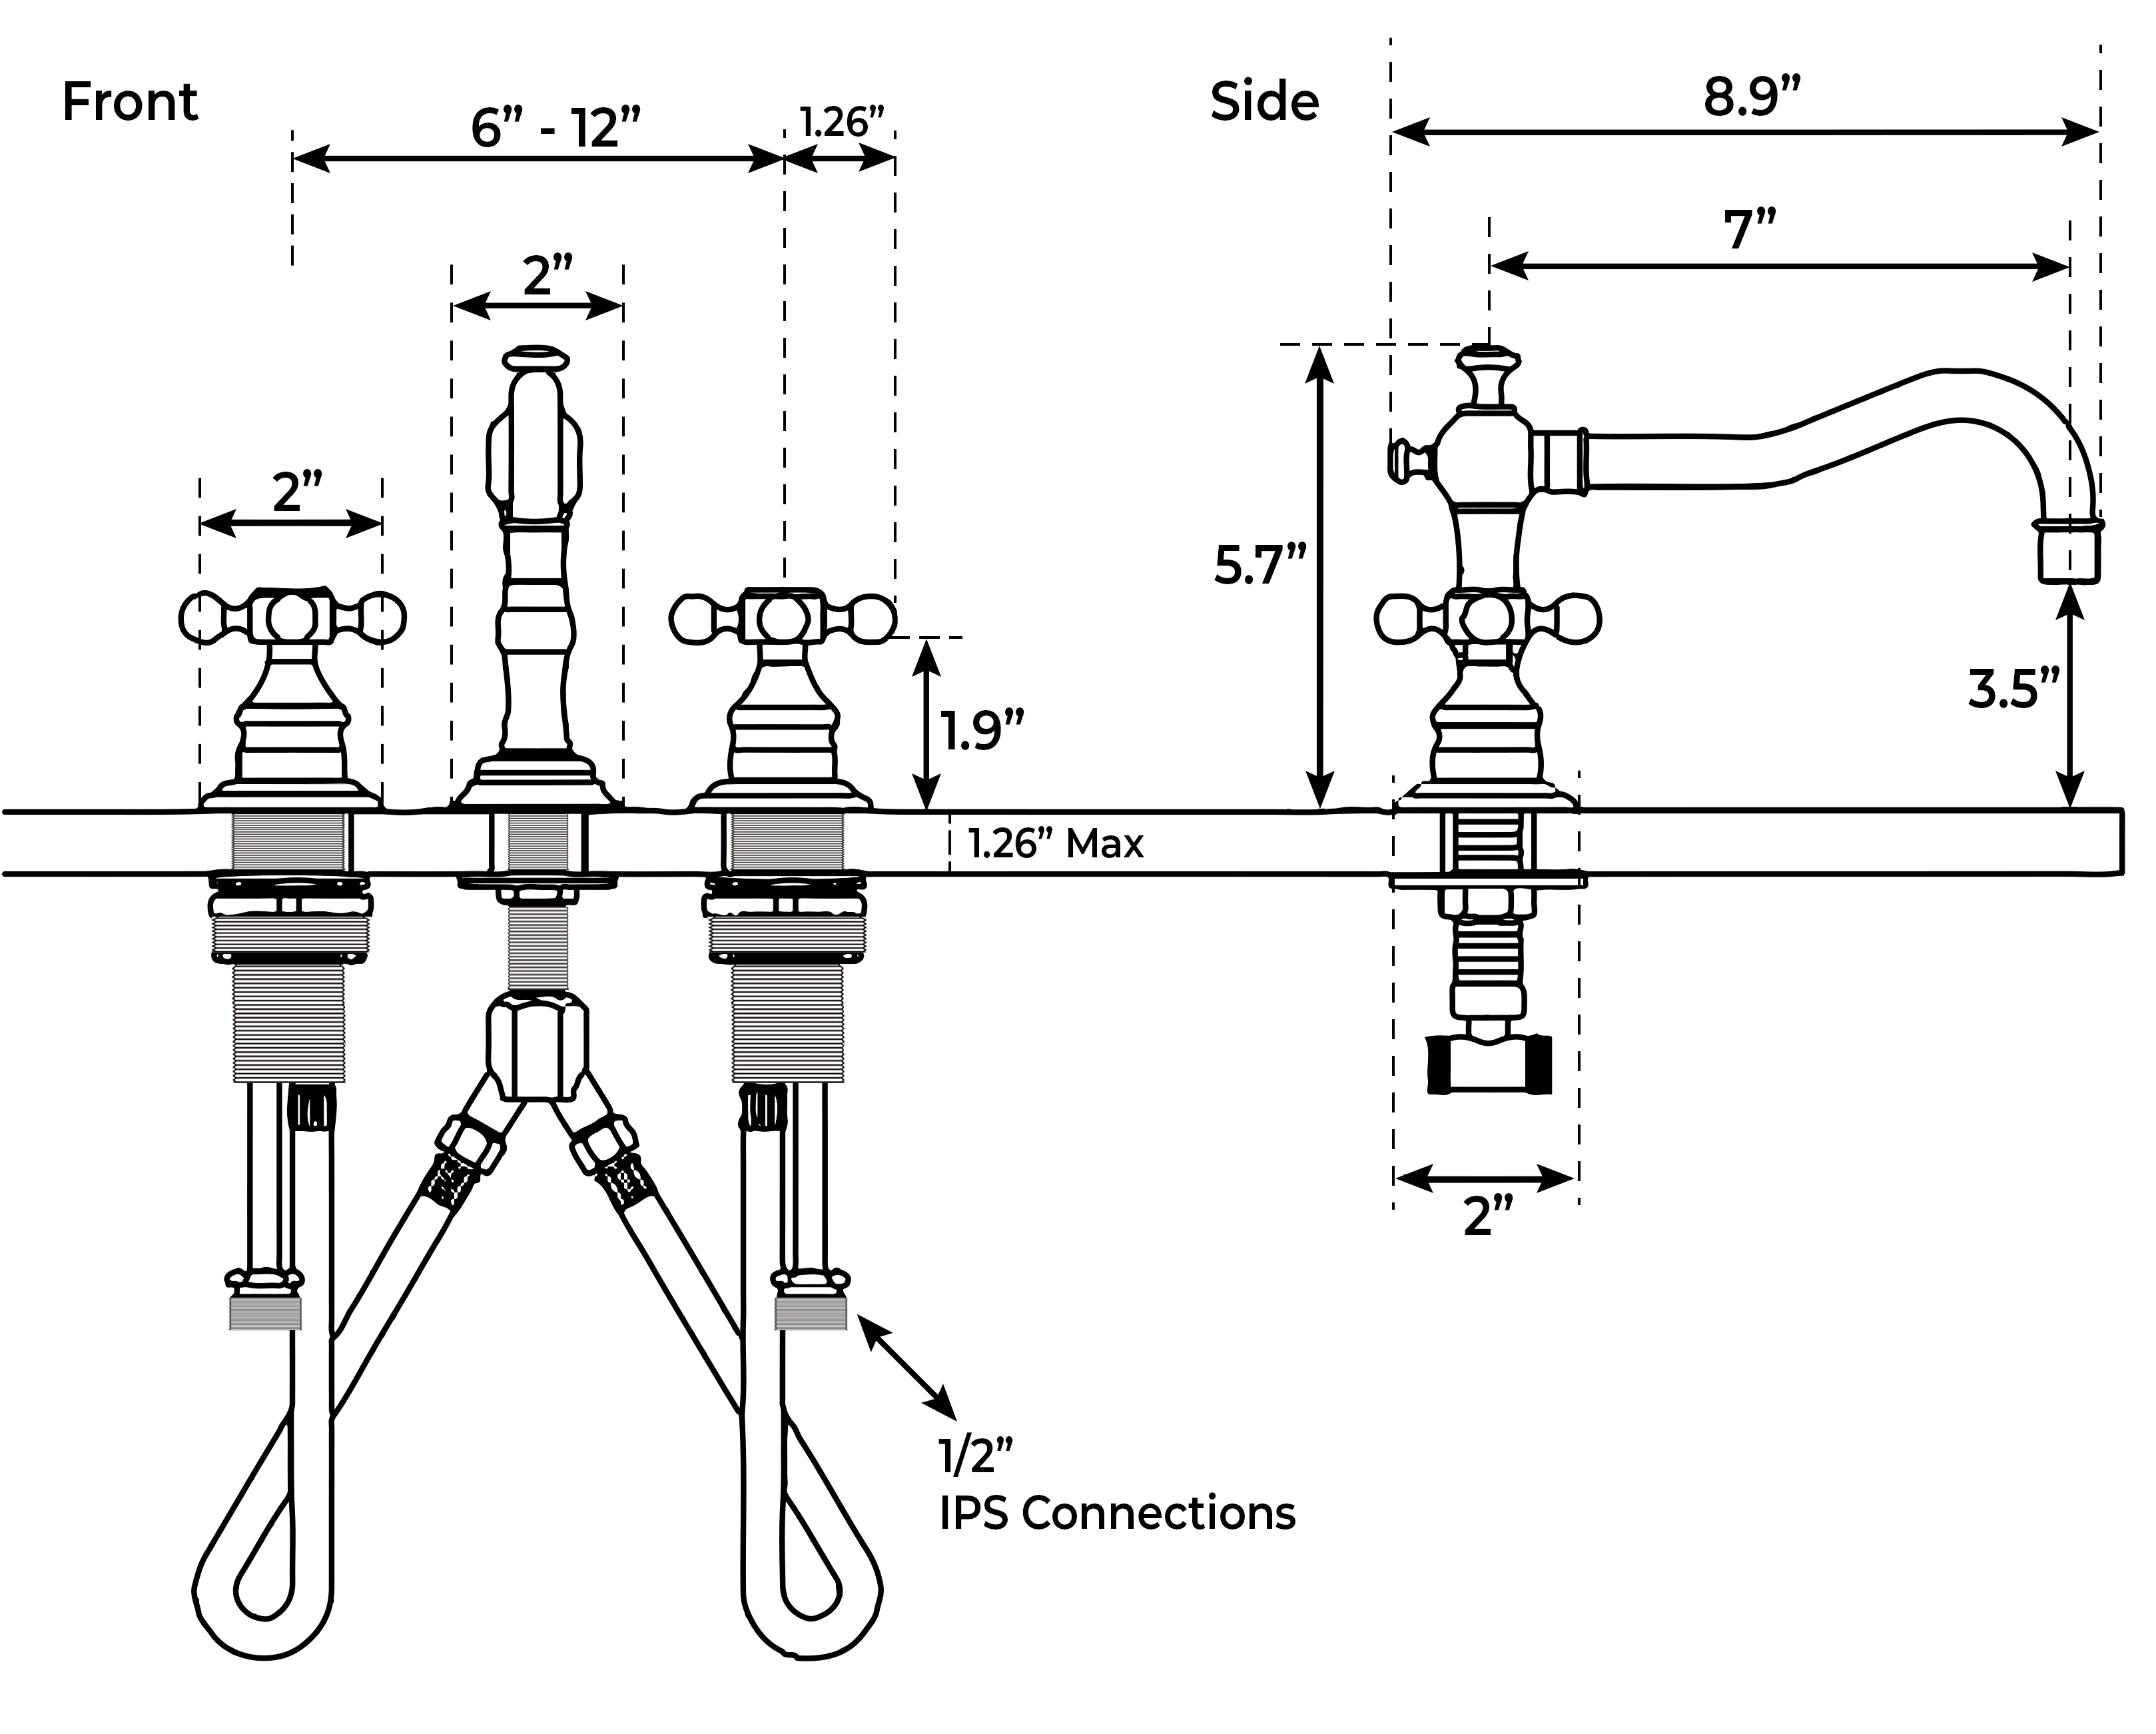
Next, carefully unpack the new faucet kit and familiarize yourself with the components and instructions included. Most bathroom faucets consist of a spout, handles, and a mounting base or plate. Begin by placing the mounting base or plate onto the sink or countertop, aligning it with the pre-drilled holes. If the faucet kit includes a rubber gasket or seal, place it between the base/plate and the surface to prevent leaks.
Once the mounting base or plate is in position, insert the faucet handles and spout into their respective holes, ensuring they are aligned correctly. Then, secure the faucet in place using the provided nuts or mounting hardware. Tighten the nuts with an adjustable wrench, being careful not to over-tighten, which could damage the faucet or sink surface. If necessary, use plumber’s tape to ensure a tight seal between threaded connections.
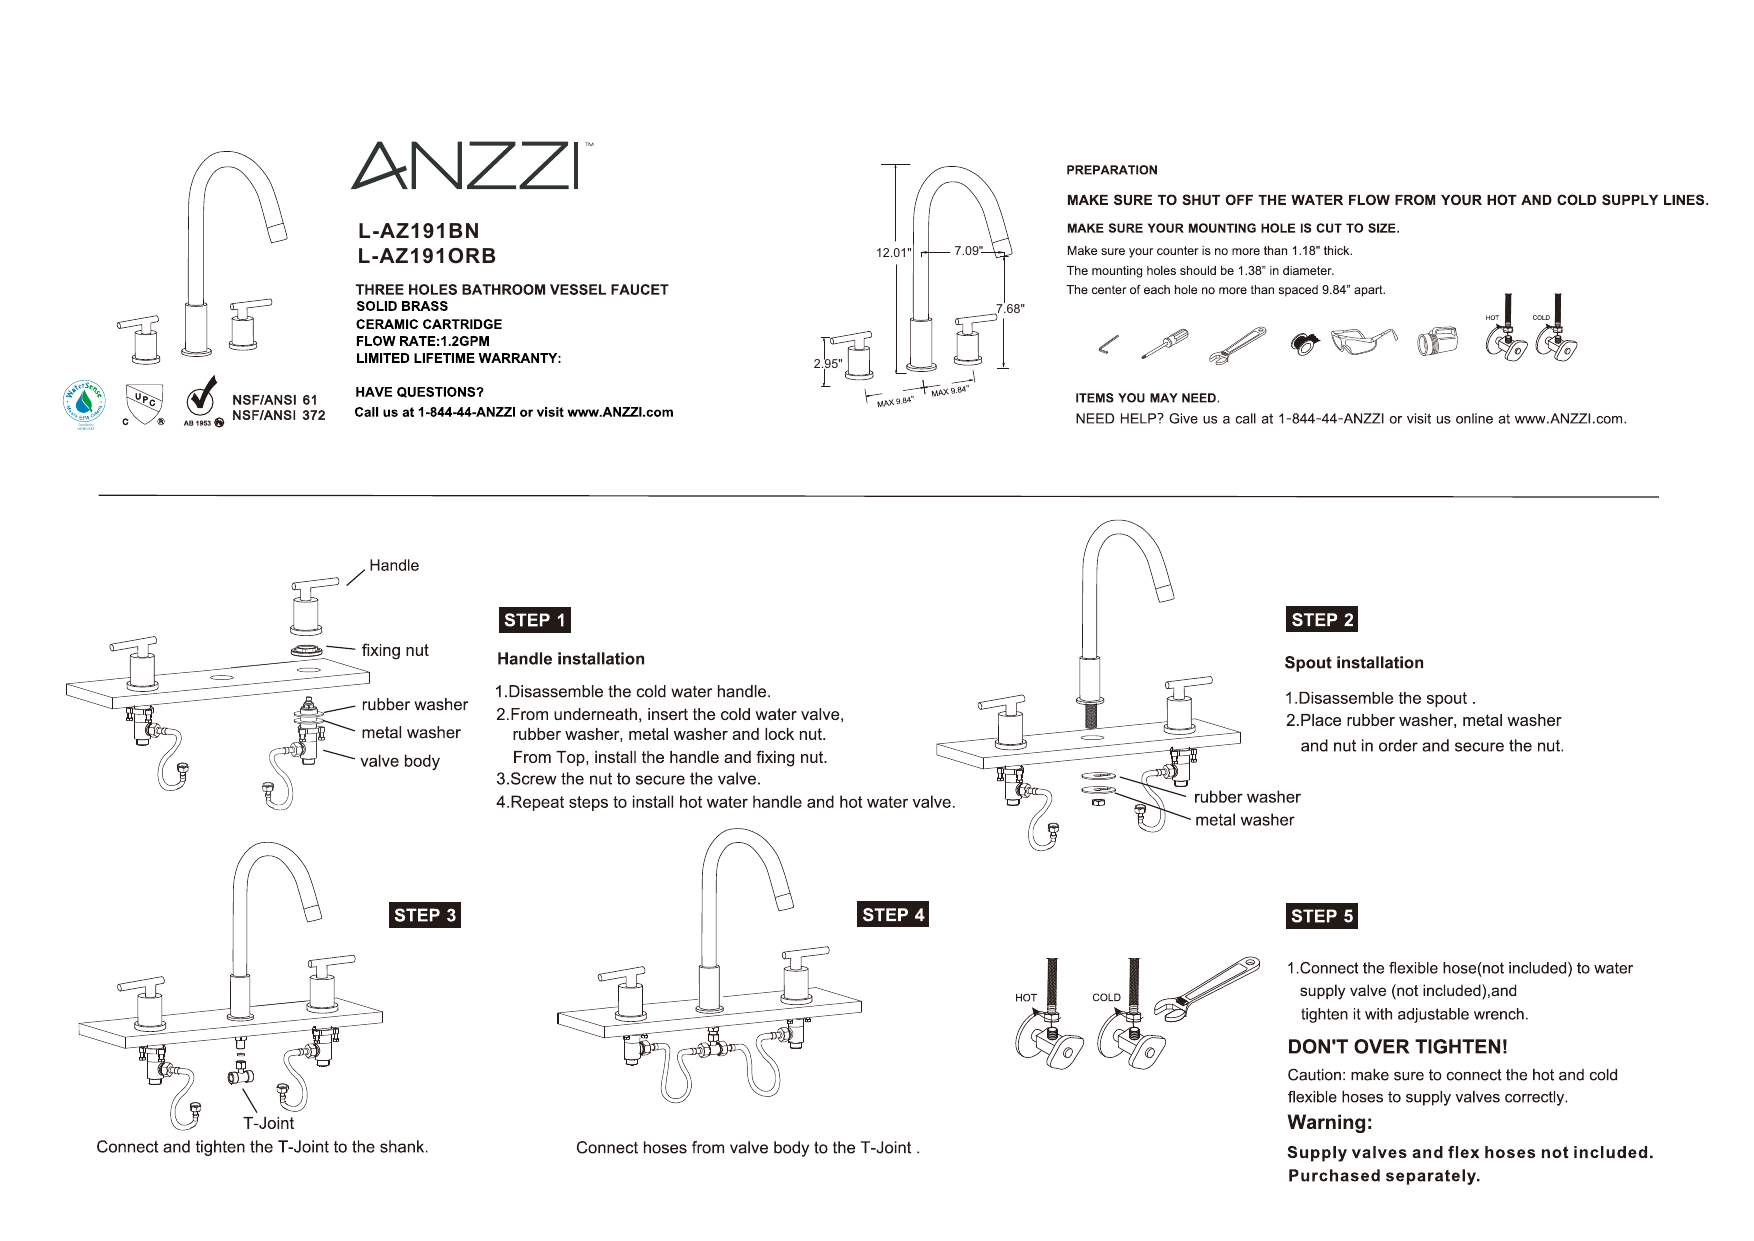
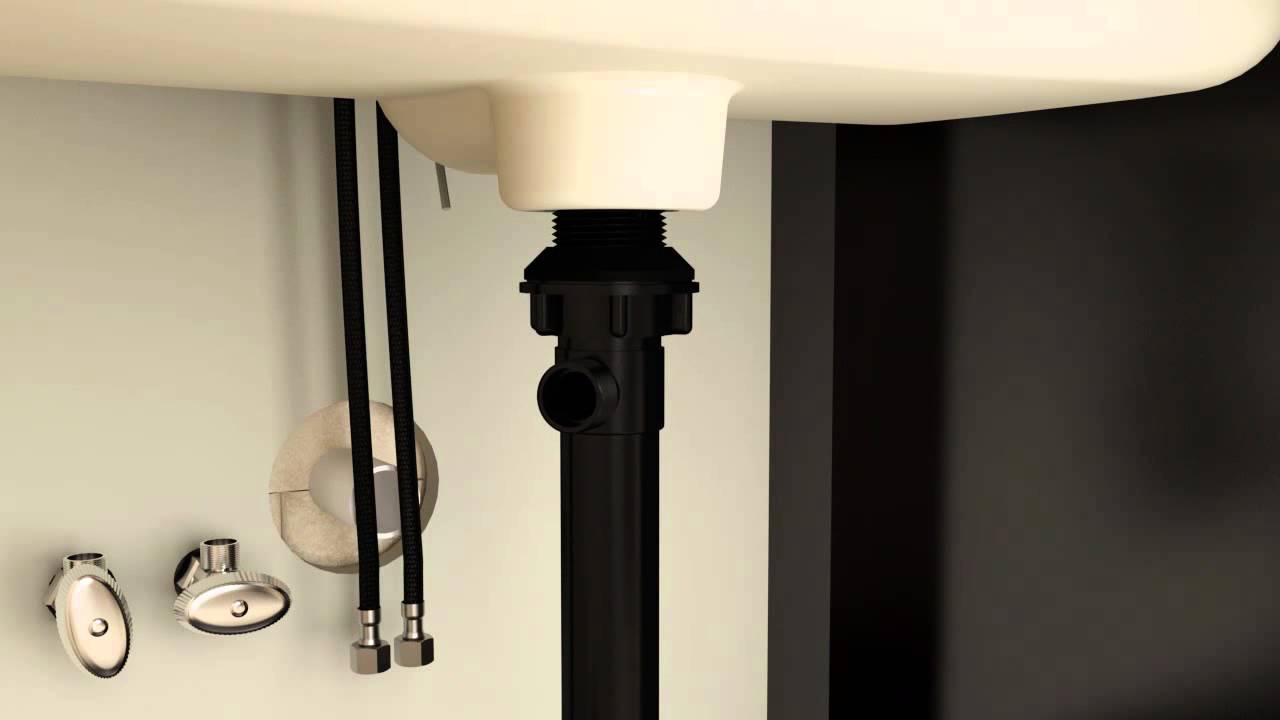
After the faucet is securely mounted, reconnect the water supply lines to the corresponding hot and cold water valves. Apply plumber’s tape to the threaded ends of the supply lines to prevent leaks, then hand-tighten the connections. Use an adjustable wrench to snugly tighten the connections, taking care not to strip the threads. Once the water supply lines are connected, turn on the water supply and check for any leaks around the faucet and water connections.
Finally, apply silicone sealant around the base of the faucet and any gaps between the faucet and sink or countertop to create a watertight seal. Smooth the sealant with a damp cloth or finger to ensure a neat and uniform appearance. Allow the sealant to dry completely before using the faucet. With proper installation and maintenance, your new bathroom faucet should provide years of reliable performance and enhance the overall look and functionality of your bathroom space.

Installation Instructions For BathSelect Soloi Solid Brass Double
Installation Instructions for Veneto Bathroom Faucet
Delta Porter Shower Faucet Installation Instructions Delta Shower

Installation Guide
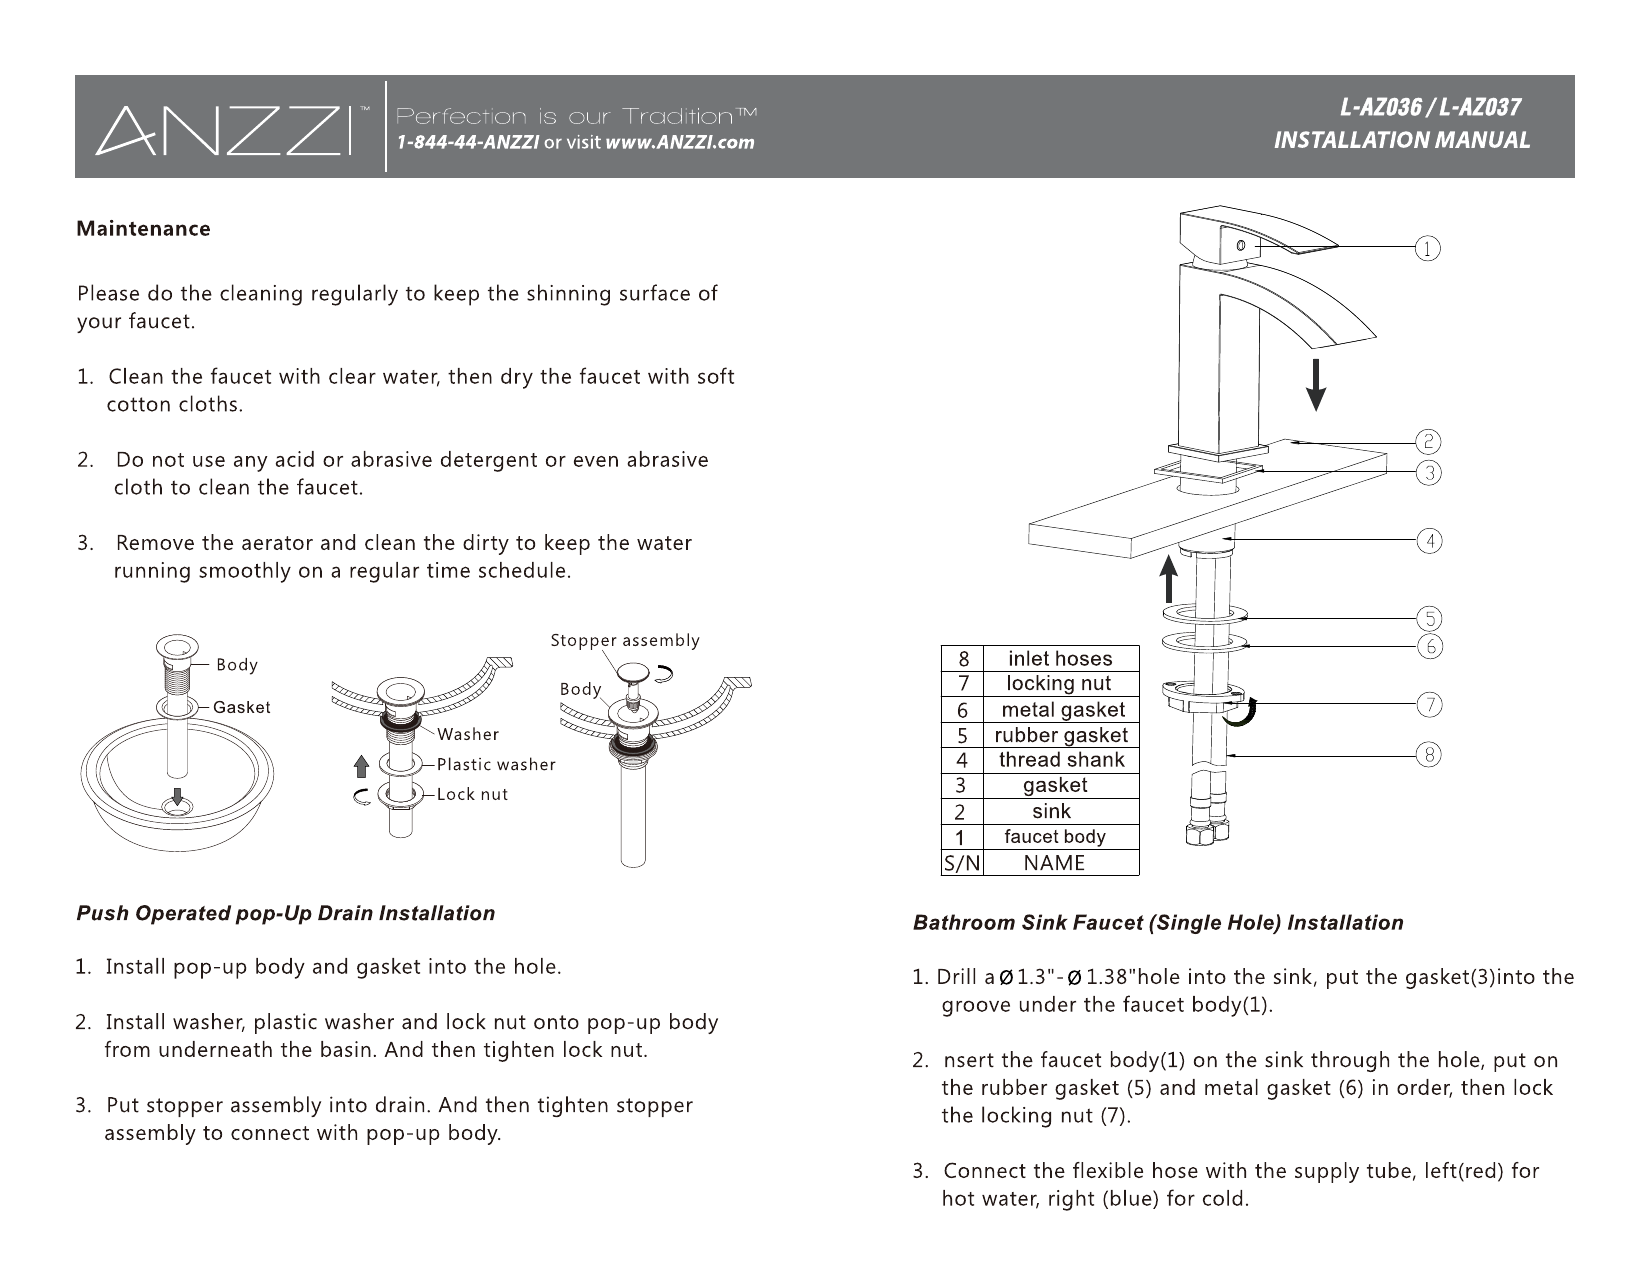
ANZZI L-AZ037 Revere Series Single Hole Single-Handle Low-Arc
Installation Instructions For BathSelect King Gold Crown Black

Installation – Elliston Single-Handle Bathroom Sink Faucet
MOEN 84115BRB-4CTR Idora 4 in. Centerset 2-Handle Bathroom Faucet

How to Install a Bathroom Faucet A DIY Guide
Related articles:
- How To Repair Bathroom Faucet Leak
- Antique Nickel Bathroom Faucet
- Best Modern Bathroom Faucets
- Brass Gold Bathroom Faucets
- Bathroom Faucets For Pedestal Sinks
- Oil Rubbed Brass Bathroom Faucets
- Bathroom Faucet Polished Nickel
- Bathroom Faucets Double Handle
- How To Fix A Leaking Bathroom Faucet Handle
- Modern Brass Bathroom Faucets
Bathroom Faucet Installation Guide
The bathroom faucet is an essential part of any bathroom. It not only serves as a functional tool for washing hands and face, but it can also add to the overall aesthetic of the space. Installing a new bathroom faucet can seem daunting, but with the right tools and instructions, it can be done easily and efficiently. In this article, we will guide you through the process step-by-step, including common FAQs.
Tools Needed:
Before starting the installation process, make sure you have all the necessary tools on hand. Here are some of the basic tools you will need:
– Adjustable wrench
– Basin wrench
– Screwdriver
– Plumber’s putty or silicone sealant
– Teflon tape
– Rags or towels
– Bucket or container to catch water
Step 1: Turn Off Water Supply
The first step in installing a new bathroom faucet is to turn off the water supply. Locate the shut-off valve under your sink or near your water heater and turn it off. If you cannot find the valve, turn off your home’s main water supply.
Can I install a bathroom faucet without turning off the water supply?
No, it is not recommended to install a bathroom faucet without turning off the water supply. This can lead to leaks and potential damage to your plumbing system.
Step 2: Remove Old Faucet
Once you have turned off the water supply, remove your old faucet by disconnecting the hot and cold water supply lines using an adjustable wrench. Use a basin wrench to loosen and remove any mounting hardware or nuts holding the faucet in place. Lift the old faucet out of its position.
How do I remove a stuck faucet nut?
A stuck faucet nut can be removed using penetrating oil, such as WD-40. Spray the nut generously and let it sit for a few minutes before attempting to remove it with a wrench or pliers.
Step 3: Clean the Area
After removing the old faucet, clean the area thoroughly. Use a rag or towel to wipe away any debris or residue from the previous installation. This will ensure a clean and smooth surface for installing the new faucet.
Can I reuse the mounting hardware from my old faucet?
It is not recommended to reuse old mounting hardware as it can become worn and corroded over time. It is best to use new hardware for a secure and long-lasting installation.
Step 4: Install New Faucet
Before installing your new faucet, apply plumber’s putty or silicone sealant around the base of the faucet. This will create a watertight seal and prevent leaks. Place the faucet into position and secure it with mounting hardware using a basin wrench. Attach the hot and cold water supply lines to their corresponding valves using an adjustable wrench.
How tight should I make the connections?
Connections should be snug but not over-tightened. Over-tightening can damage the connections and cause leaks. Use Teflon tape on threaded connections for added security.
Step 5: Test for Leaks
After completing the installation, turn on the water supply and test for leaks. Check all connections and joints for any signs of dripping or leaking. If there are no leaks, you’re done!
What should I do if there are leaks after installation?
If you notice any leaks after installation, turn off the water supply and double-check all connections. Tighten any loose connections or replace faulty parts as necessary.
Installing a new bathroom faucet may seem intimidating, but with these easy steps, anyone can do it themselves. Remember to gather all necessary tools beforehand, turn off the water supply before starting, and follow each step carefully. By following this guide, you’ll have a beautiful new bathroom faucet in no time!
Disclaimer:
It is important to note that plumbing work can be complex and may require professional assistance. If you are unsure about any aspect of the installation process, it is recommended that you consult a licensed plumber. Additionally, always follow manufacturer instructions and local building codes when installing plumbing fixtures. I cannot be held responsible for any damages caused by following the instructions provided in this article. Use these instructions at your own risk.