Understanding the anatomy of a bathroom sink faucet is not only useful for homeowners looking to do DIY repairs or upgrades but also for anyone who wants to grasp the fundamentals of plumbing fixtures. A typical bathroom sink faucet consists of several essential components that work together to control the flow of water. At its core, a faucet comprises a spout, handles or knobs, valves, and various internal parts.
Here are Images about Bathroom Sink Faucet Diagram
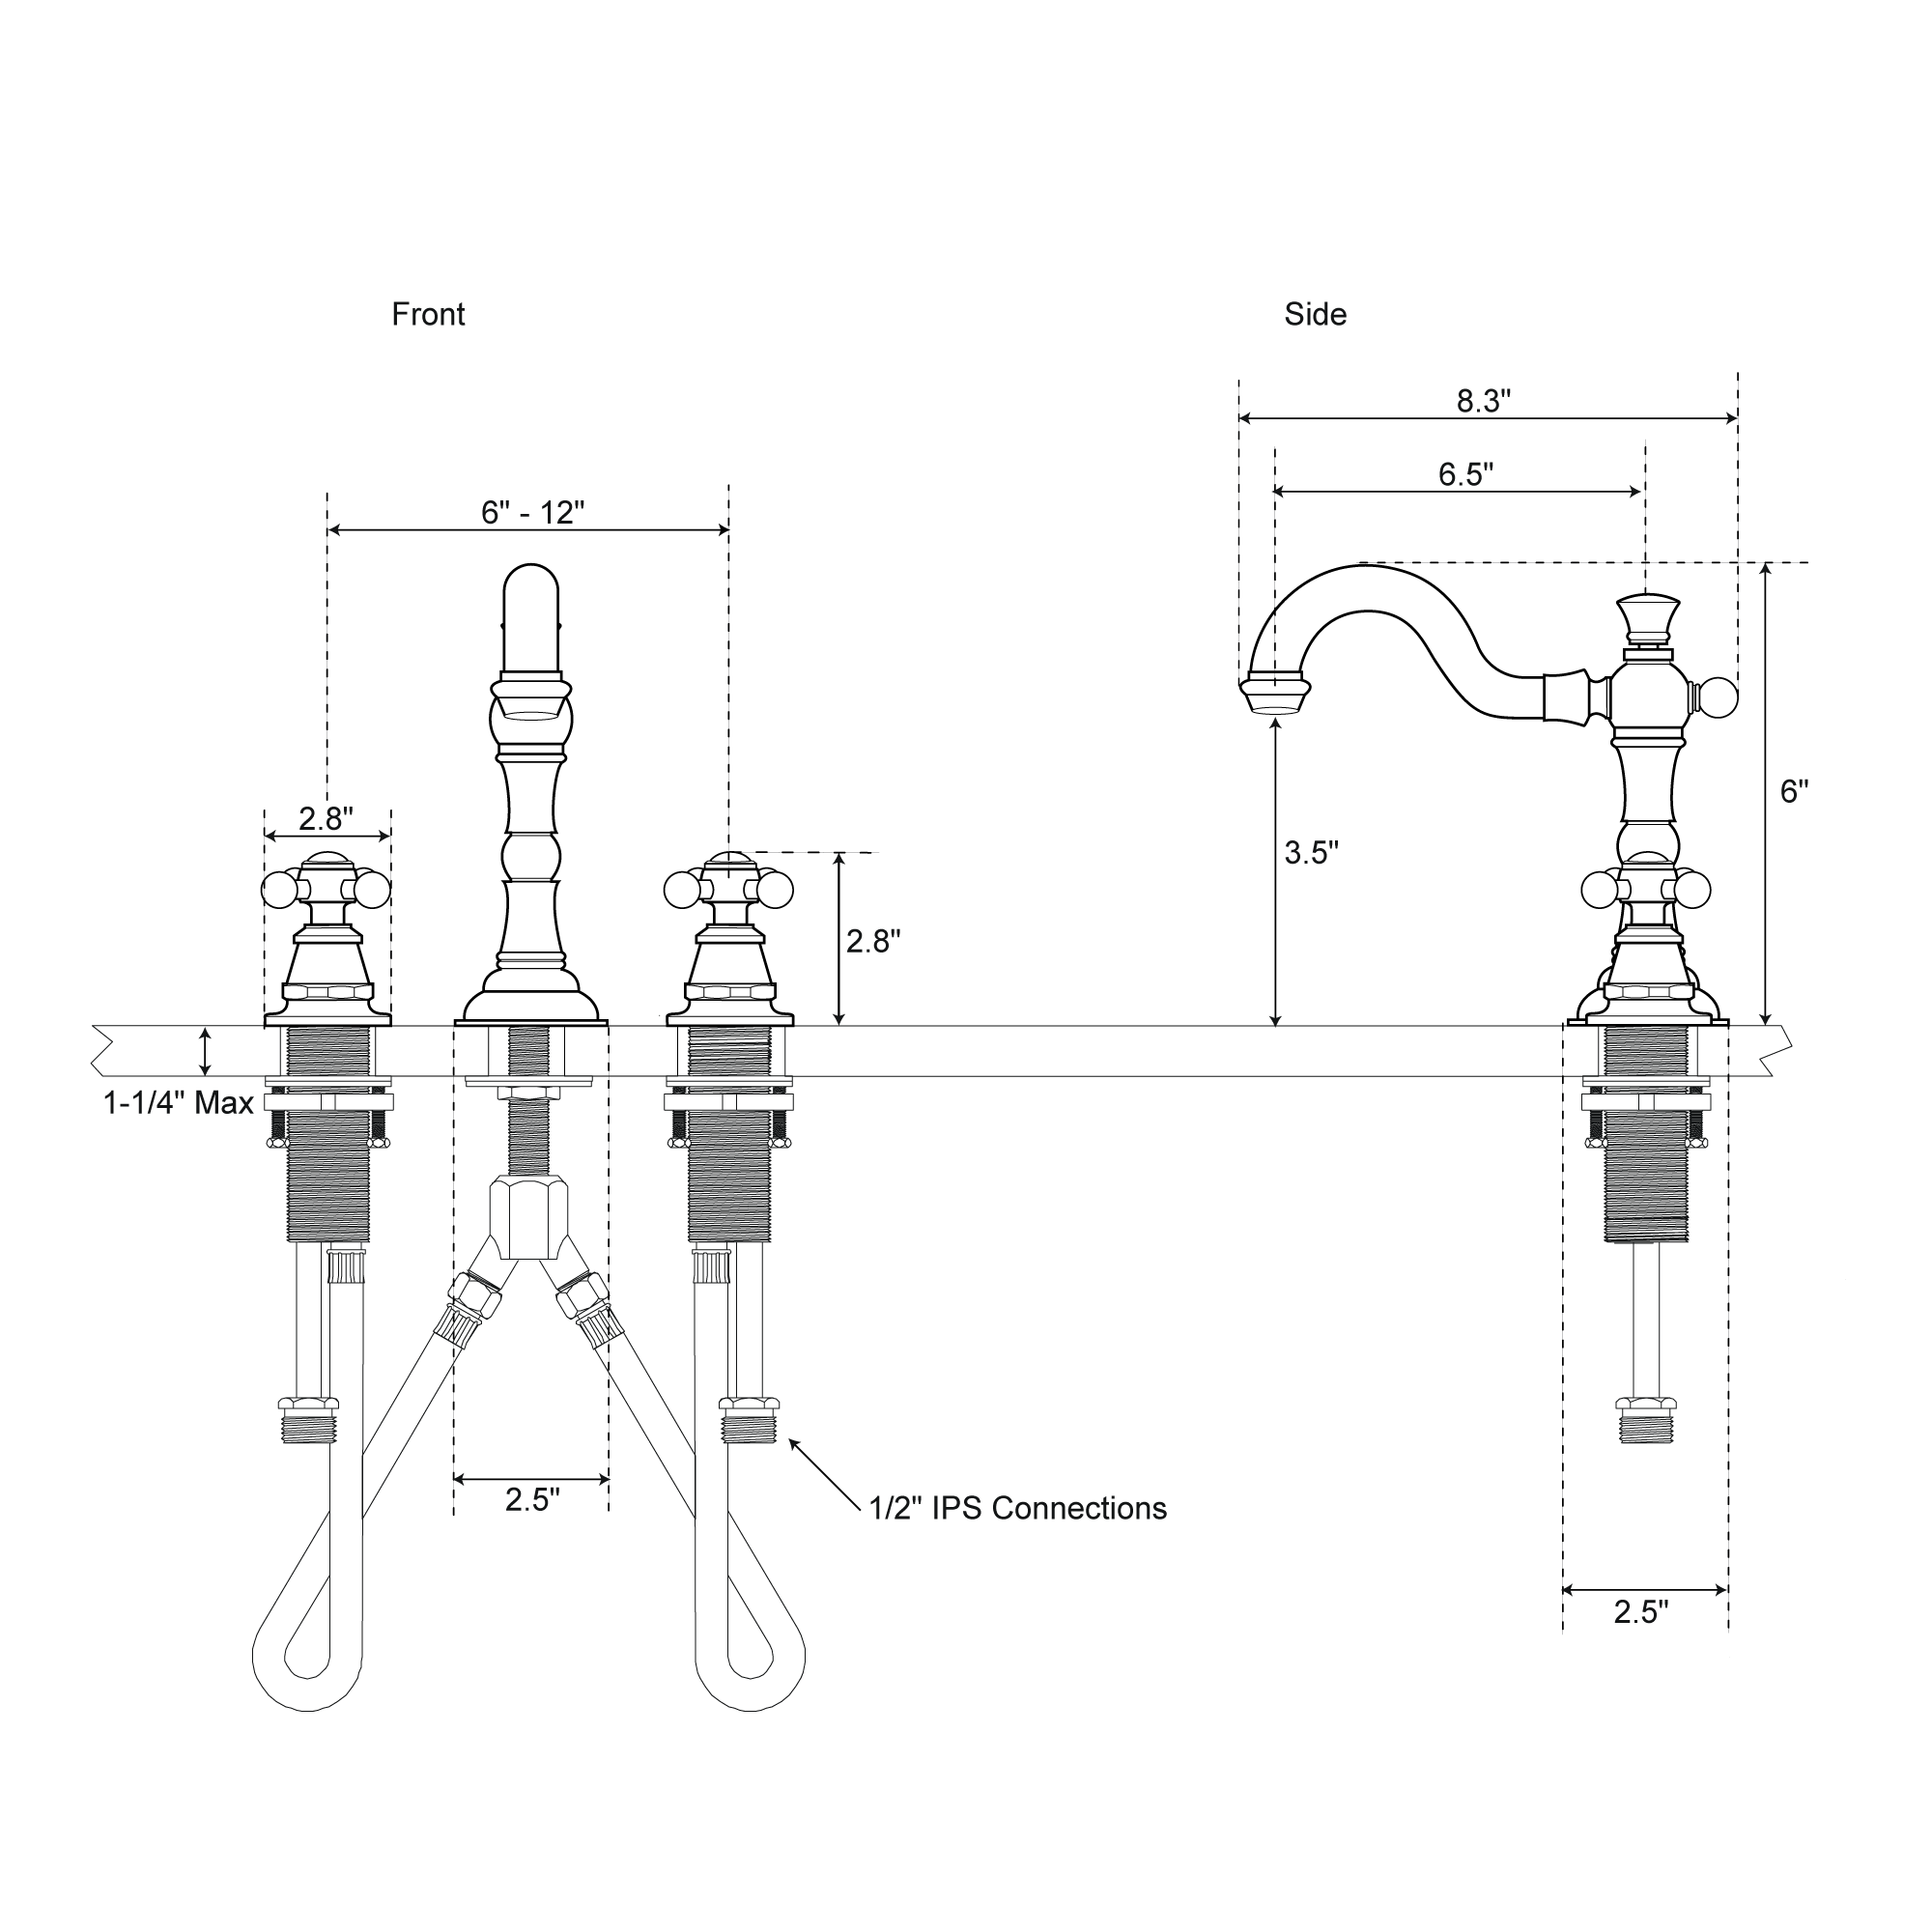
Bathroom Sink Faucet Diagram

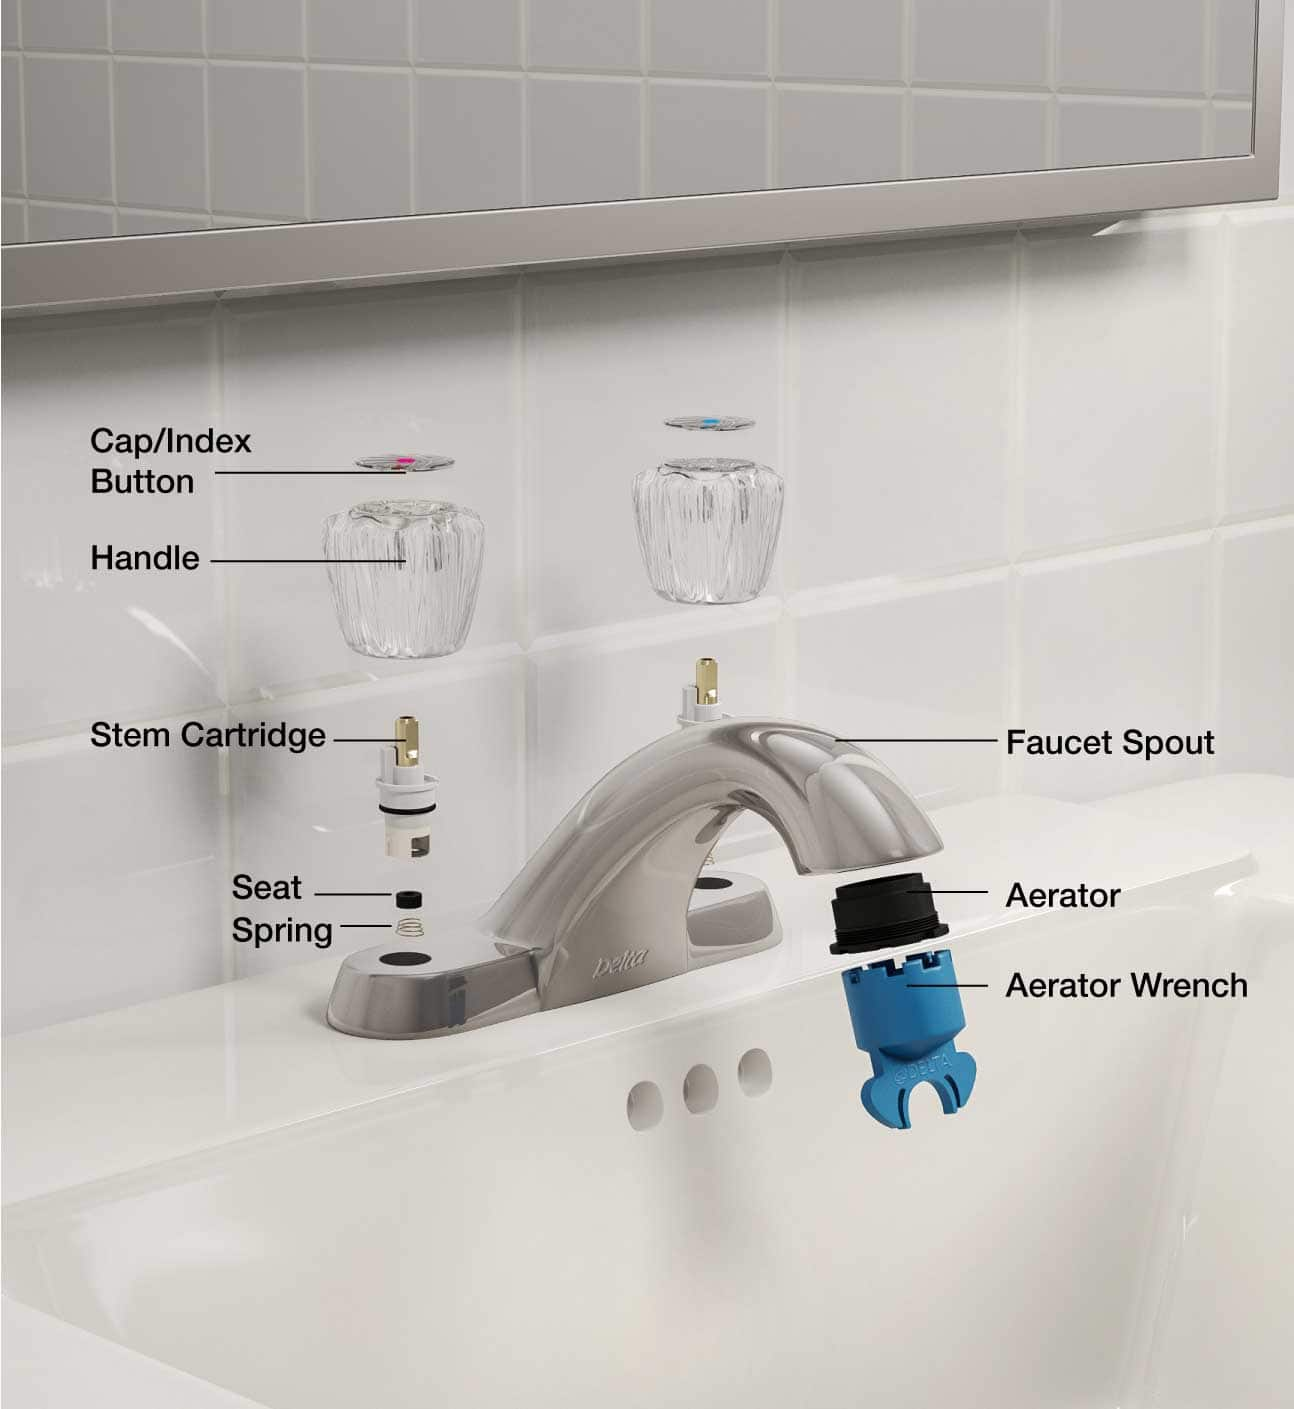
The spout is the visible part of the faucet where the water flows out. It can have different shapes and lengths, depending on the faucet’s design. Some faucets have a single spout, while others may have separate hot and cold spouts. The handles or knobs are what you turn or lift to control the water flow and temperature. These handles are connected to the valves, which are responsible for regulating the flow of hot and cold water. There are different types of valves, including compression valves, ball valves, and cartridge valves, each with its own mechanism for controlling water flow. Inside the faucet, there are various internal components like seals, O-rings, and washers that help prevent leaks and ensure smooth operation.
20 Bathroom Sink Drain Parts: How They Works?
Understanding the diagram of a bathroom sink faucet is essential when it comes to maintenance and repairs. If you’re experiencing leaks, low water pressure, or temperature control issues, knowing how these components fit together can help you identify the problem and, in some cases, fix it yourself. Regular maintenance, such as replacing worn-out washers or O-rings, can extend the lifespan of your faucet and prevent water wastage. Additionally, when choosing a new faucet for your bathroom, having a basic understanding of its internal workings can help you make an informed decision and select a faucet that meets your specific needs and preferences.
Images Related to Bathroom Sink Faucet Diagram
Bath Sink Faucet Parts Delta Bathroom Sink Faucet Parts

You can also find sinks in various depths depending on just how much room you have between your countertop and plumbing underneath, and how much water your sink will need to hold. Depending upon what the sink is going to have to endure and whether it will are available in regular contact with water, the choice of the material could be decided.
Faucet Parts – The Home Depot
Troubleshooting a Leaking Faucet : Delta Faucet

Top sink companies as Toto and Kohler offer dozens of undermount sink styles. If the need is for several person to use the bathroom in exactly the same time, subsequently the two fold sink vanity is really a need. Many individuals have taken classes or even been shown by a skilled how you can install bathroom fittings.
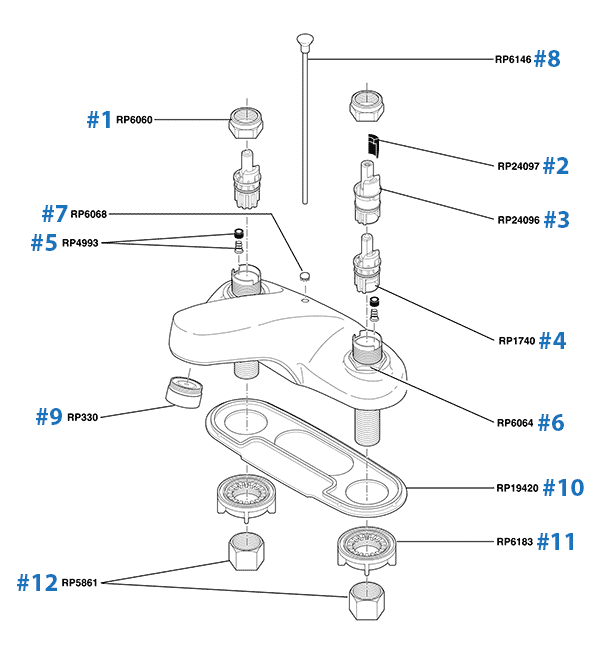
Repair Parts for One and Two Handle Delta Bathroom Faucets
Rv Bathroom Sink Faucet Check more at http://s2pvintage.com/22334

Sigma Faucets and Parts Store u2013 Sigma Faucet Parts

Faucet Parts u0026 Repair

Faucet Parts – The Home Depot

Bathroom Sink Fixture Loose DIY Home Improvement Forum

BWE Bathroom Sink Faucet with Drain Assembly and Supply Hose Lead-Free Waterfall Matte Black Faucet Single-Handle Single Hole Lavatory Mixer Tap
Bathroom Sink Faucet Diagram You can see the different home

Installation Instructions for Modena Widespread 8″ Antique Brass
Related articles:
- Bathroom Sink Cabinets Modern
- Rustic Bathroom Sink Ideas
- Bathroom Sink Storage Ideas
- Farmhouse Bathroom Sink Ideas
- Bathroom Sinks Blue
- Bathroom Sink 400mm
- Ada Bathroom Sink Dimensions
- Bathroom Sink Marble Countertop
- Bathroom Sink Design Ideas
- Bathroom Sink Pipe Leak Repair
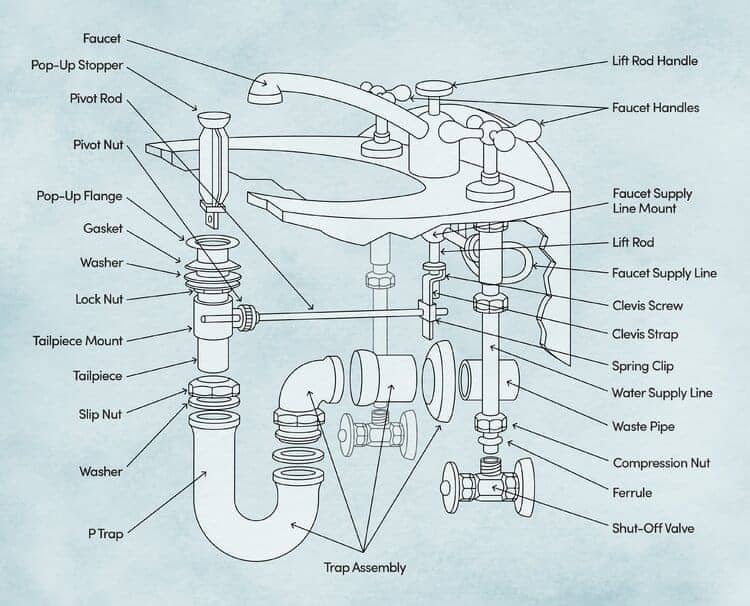
Introduction to Bathroom Sink Faucet Diagrams
A bathroom sink faucet diagram is a diagram that depicts the parts of a sink faucet and how they fit together. It usually includes a visual representation of the components and their associated functions. Knowing how each part works is essential for DIY plumbing projects or when you need to replace a part or two. By having this diagram, you can easily identify what needs to be done and how to go about it. This article will go into detail about the parts of a sink faucet, what their functions are, and the different types of sink faucets available.
Components of a Bathroom Sink Faucet Diagram
The components of a bathroom sink faucet diagram can vary depending on the type of faucet you have. The most common components are the spout, handle, escutcheon, cartridge, aerator, and supply lines. Each component has its own purpose and knowing what it does will help you in your DIY plumbing projects.
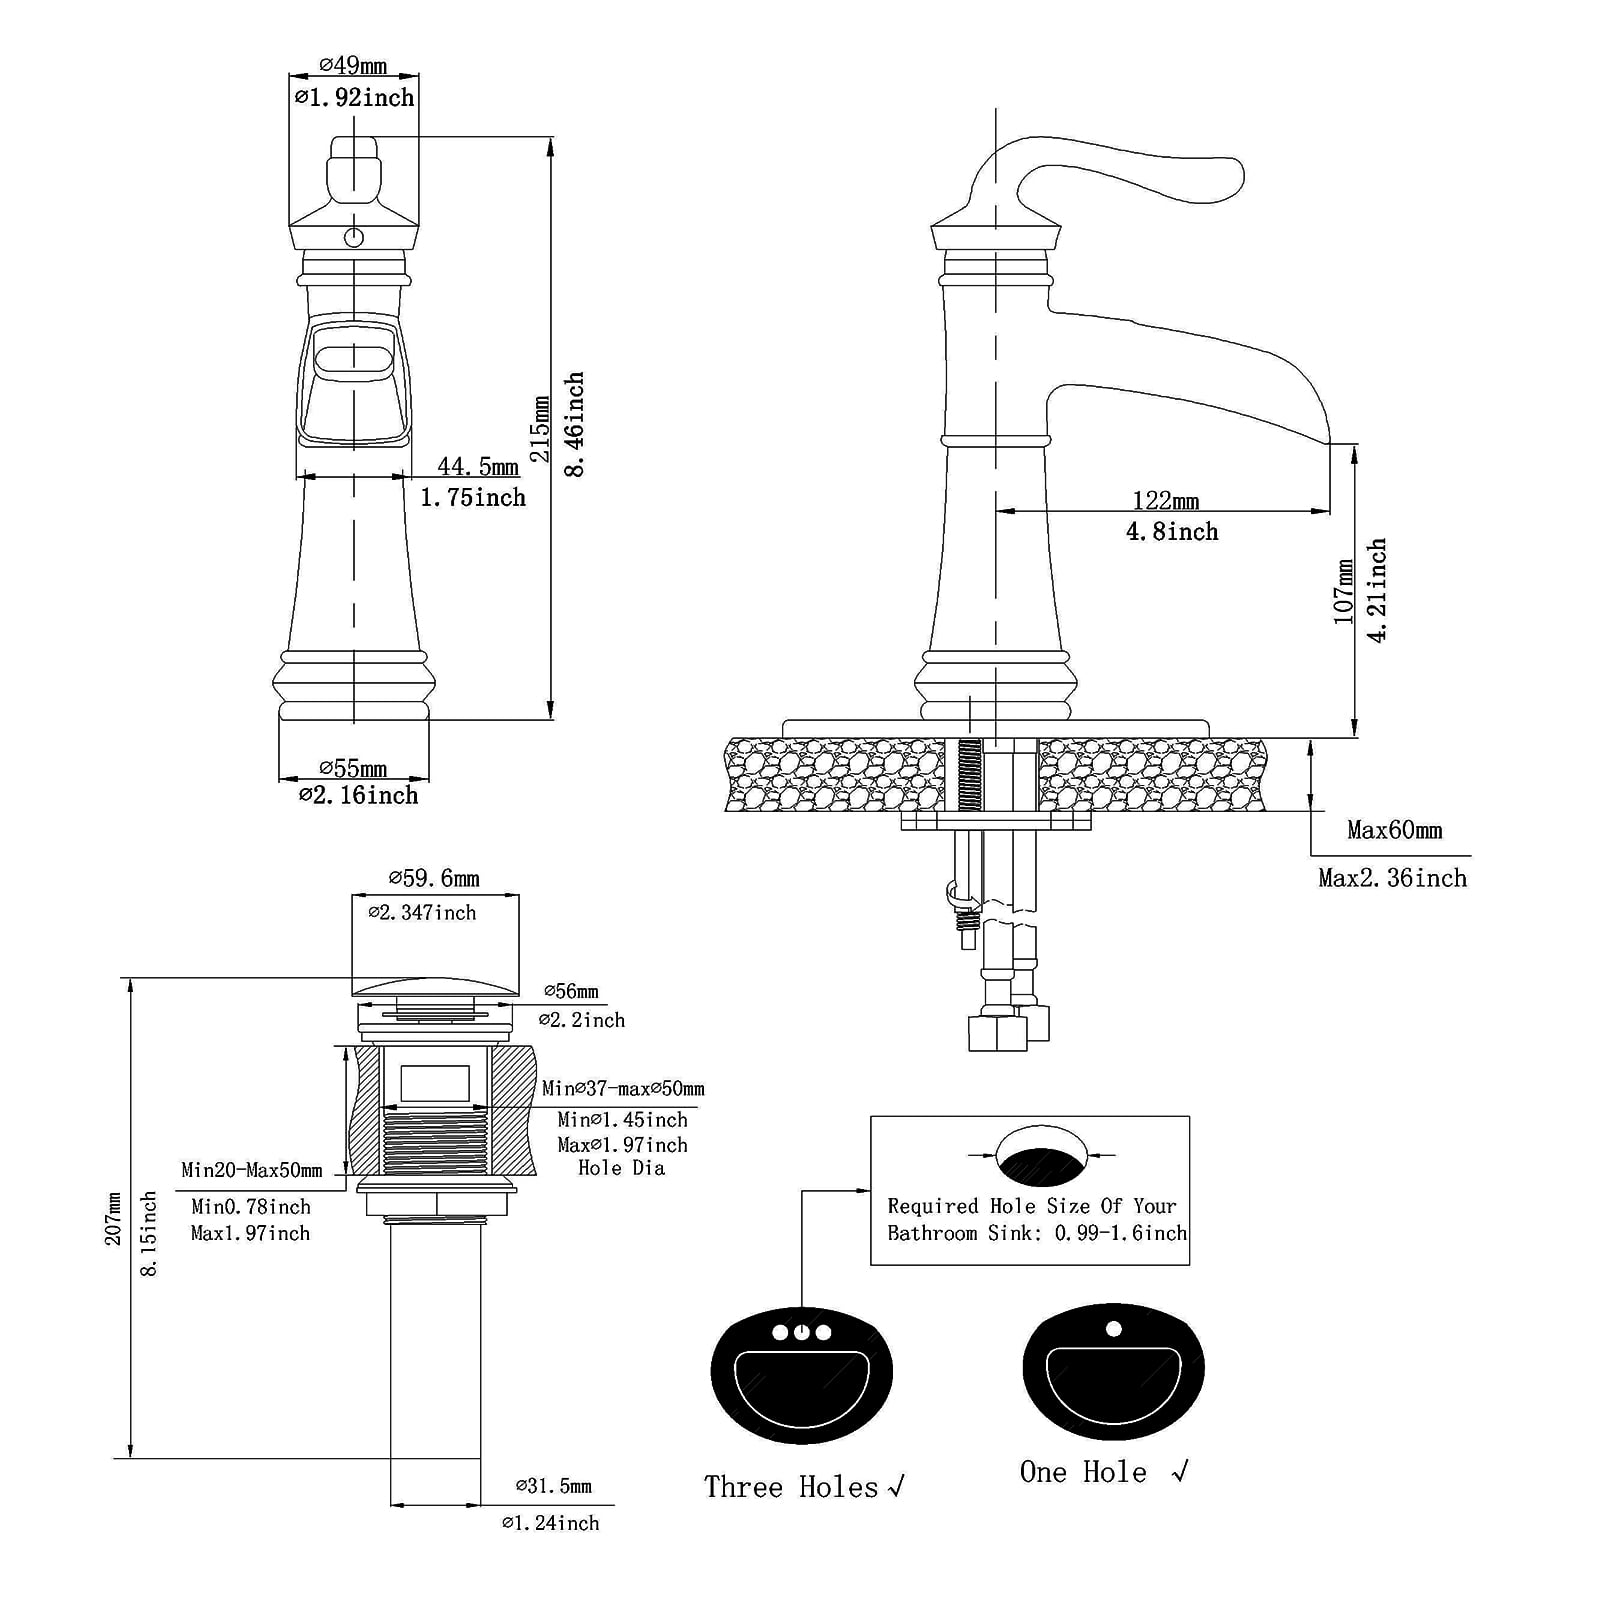
Spout: The spout is the visible part of the faucet that extends from the base. It is connected to the handle by a stem and can come in different shapes such as straight or curved. The purpose of the spout is to direct water from the supply lines into your sink or basin.
Handle: The handle is used to turn on or off the flow of water from the spout. It usually consists of two separate pieces which are held together with screws or nuts. Turning one way will turn on the water while turning it the other way will turn it off.
Escutcheon: The escutcheon is an optional piece that covers up any exposed piping from underneath your sink. It also helps to protect your wall from any damage caused by water leaking from your sink or taps.
Cartridge: The cartridge is an internal part that controls the flow of water from your faucet handle. It contains seals and valves that help regulate the pressure and temperature of your water flow.
Aerator: An aerator is a small device attached to the end of your spout which helps reduce splashing while also reducing water consumption. This device works by breaking up large droplets into much smaller droplets which results in less splashing and less wastefulness when using your taps.
Supply Lines: Supply lines are pipes that run underneath your sink which deliver water from your main supply line to your taps and fixtures. They usually come in two sizes; ½ inch for cold water supply lines and ¾ inch for hot water supply lines.
Types of Sink Faucets
There are several different types of sink faucets available in today’s market, each designed with its own unique features and benefits. The most popular types include pull-down, pull-out, single lever, two-handle, wall mounted, bridge style, pot filler, bar prep faucets, laundry tubs, and widespread faucets among others.
Pull-Down Faucets: Pull-down faucets are one of the most popular types due to their convenience and ease-of-use. They have a spray head which can be pulled out from its base so that it can reach any area within reachable distance around your sink basin. They are also easy to install since they only require one hole in your countertop for installation purposes.
Pull-Out Faucets: Pull-out faucets offer more flexibility than pull-down models due to their extendable hose feature which allows them to reach further distances such as over tall pots or pans in order to fill them with water or rinse dishes etcetera without having to move them around manually as you would with a pull-down model.
Single Lever Faucets: Single lever faucets are very common and easy to use since all you need to do is move one lever up or down in order to control both temperature and flow rate settings simultaneously without having to adjust multiple knobs at once like with two-handle models for example.
Two Handle Faucets: Two handle faucets are designed with separate valves for controlling both temperature settings (hot And cold) and flow rate settings (low and high). Although they are a bit more complicated to install and use, they offer more precise temperature control as you can adjust each valve separately for exact temperature settings.
How do you install a bathroom sink faucet?
1. Turn off the water supply valve located on the wall behind the sink.
2. Disconnect the supply lines from the valves.
3. Remove the existing faucet and drain assembly from the sink.
4. Use a putty knife to remove any old putty or caulk from around the sink and drain assembly.
5. Apply a bead of plumber’s putty or silicone caulk around the edge of the faucet base.
6. Place the faucet into position on the sink and press it down firmly to seat it in place.
7. Secure the faucet to the sink with mounting nuts or screws provided with your new faucet set.
8. Connect the hot and cold supply lines to their respective valves, using Teflon tape or pipe dope to ensure a watertight connection.
9. Turn on the water supply valves and test for leaks at each connection point before putting away any tools and supplies used during installation.