Installing a bathroom sink can seem like a daunting task, but with the right tools and a clear step-by-step guide, it can be a manageable DIY project. The first step in installing a bathroom sink is to choose the appropriate type of sink for your space. There are several types to consider, including pedestal sinks, wall-mounted sinks, vanity sinks, and vessel sinks. Each type has its own installation requirements and aesthetic advantages. For instance, pedestal sinks are great for smaller bathrooms as they take up less space, while vanity sinks offer additional storage. Understanding the layout and space of your bathroom will help determine which sink type will work best.
Before beginning the installation, it’s essential to gather all the necessary tools and materials. These typically include a wrench, plumber’s tape, silicone sealant, a level, a drill, screws, and mounting brackets. Additionally, ensure that you have the sink, faucet, and any connecting pipes or hoses. It’s also a good idea to shut off the water supply to the bathroom and have a bucket or towels on hand to catch any residual water from the pipes. Preparing the workspace by removing the old sink and cleaning the area thoroughly will make the installation process smoother and more efficient.
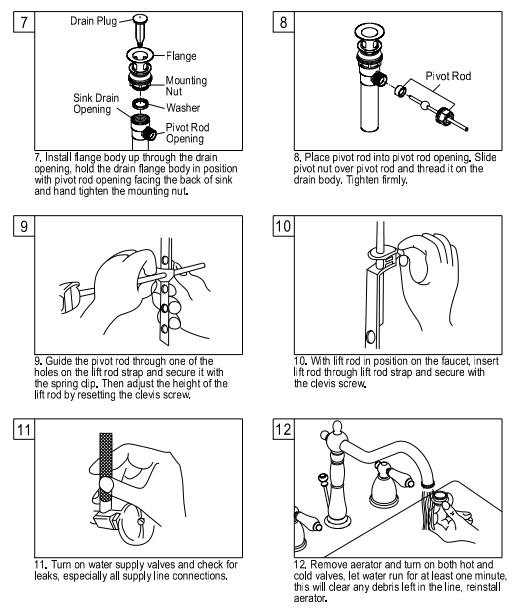
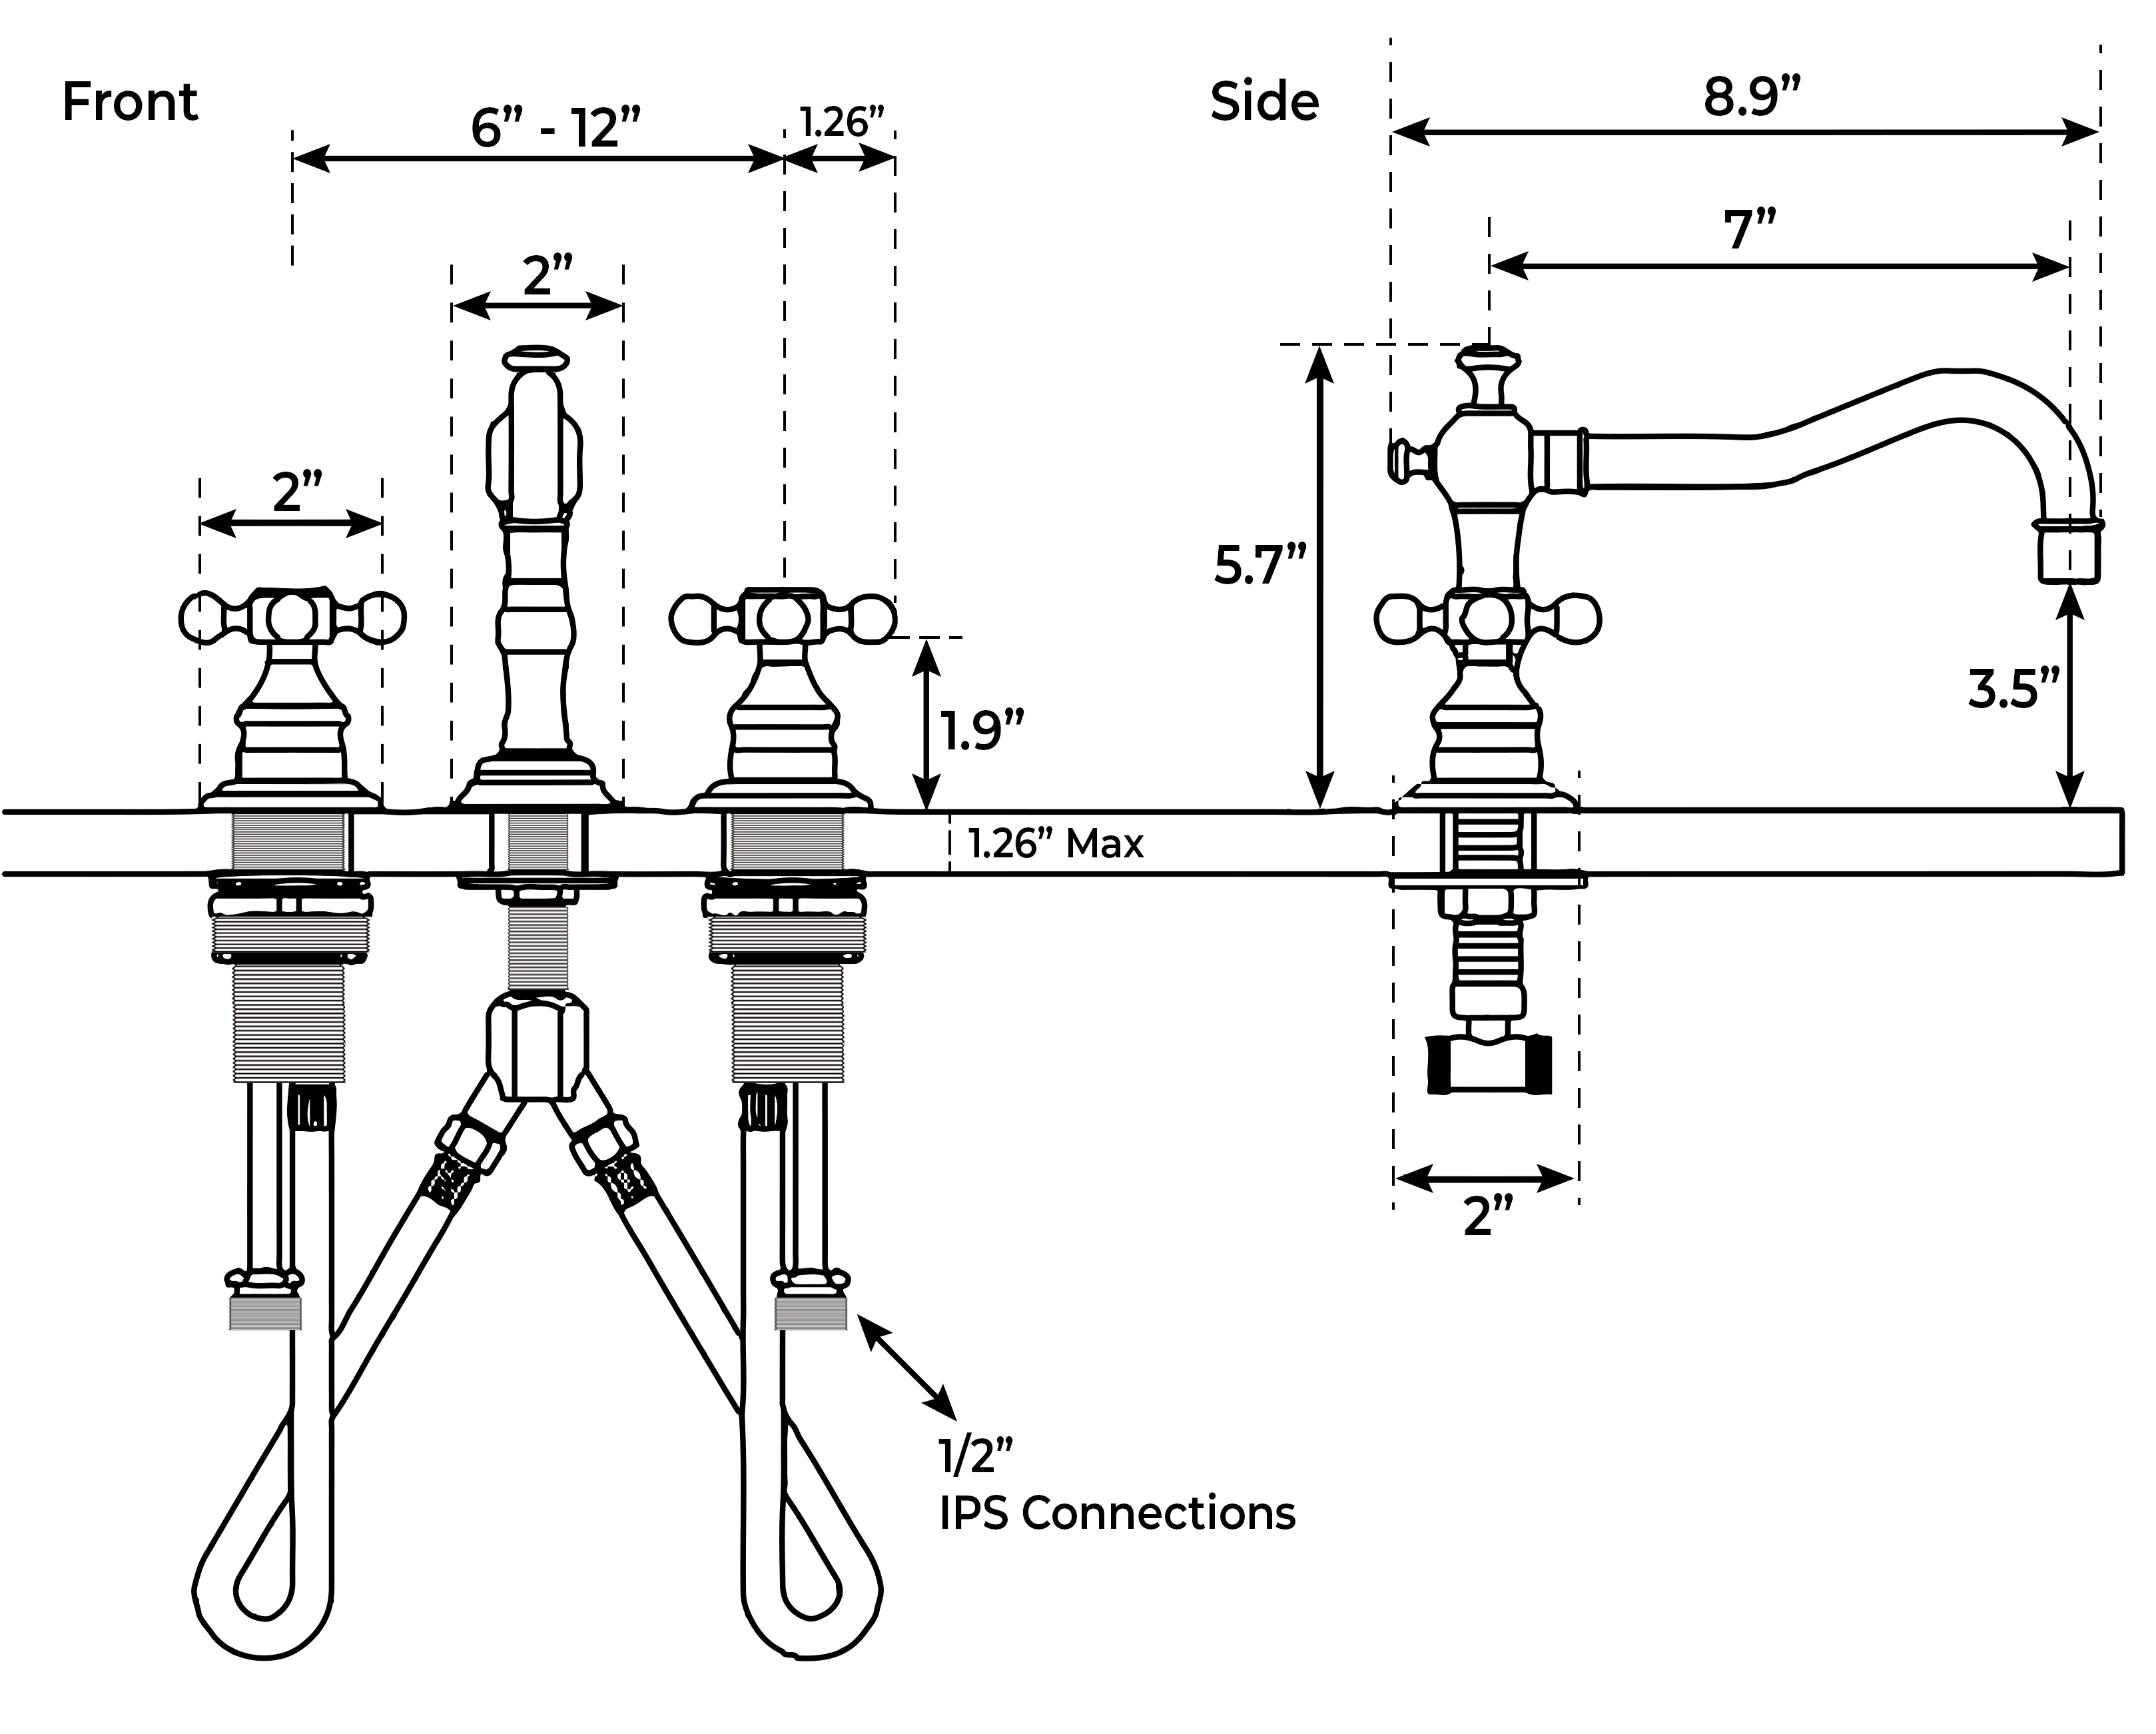
The next step is to install the faucet and drain assembly on the sink before placing it in its final position. This step is often easier to perform while the sink is still accessible and not yet mounted. Follow the manufacturer’s instructions to attach the faucet and drain. Typically, this involves inserting the faucet into the pre-drilled holes on the sink and securing it with nuts underneath. The drain assembly usually involves inserting the drain flange into the sink’s drain hole and tightening it from underneath with a gasket and nut. Applying a plumber’s tape to the threads can help ensure a watertight seal. Once these components are securely attached, you can move on to positioning the sink.
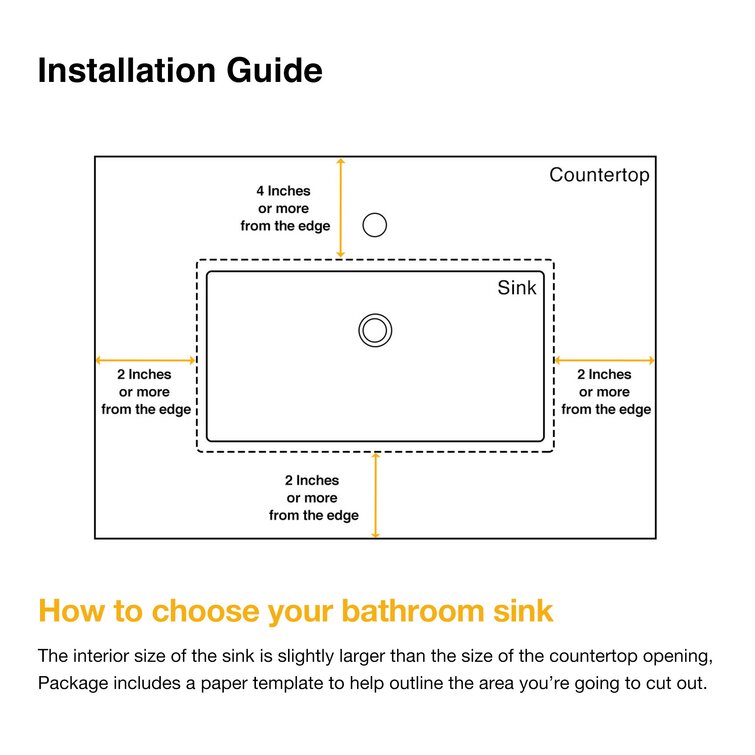
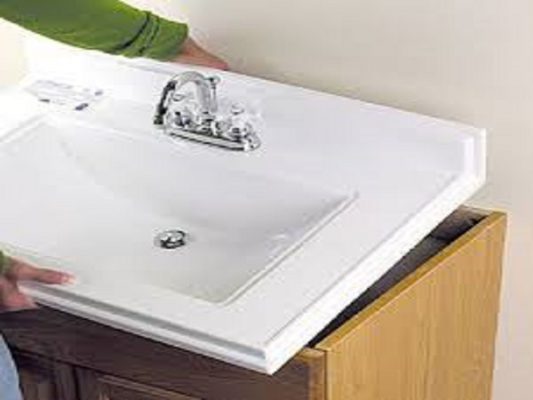
Positioning the sink correctly is crucial for both function and aesthetics. If you’re installing a pedestal or wall-mounted sink, use a level to ensure it is straight before securing it. For wall-mounted sinks, mark the mounting holes on the wall and drill pilot holes for the screws. Use mounting brackets or a mounting plate as specified by the manufacturer, and attach the sink securely to the wall. For vanity sinks, the process involves placing the sink onto the vanity or countertop, ensuring it fits snugly and is level. Apply silicone sealant around the edges of the sink where it meets the countertop to create a watertight seal.
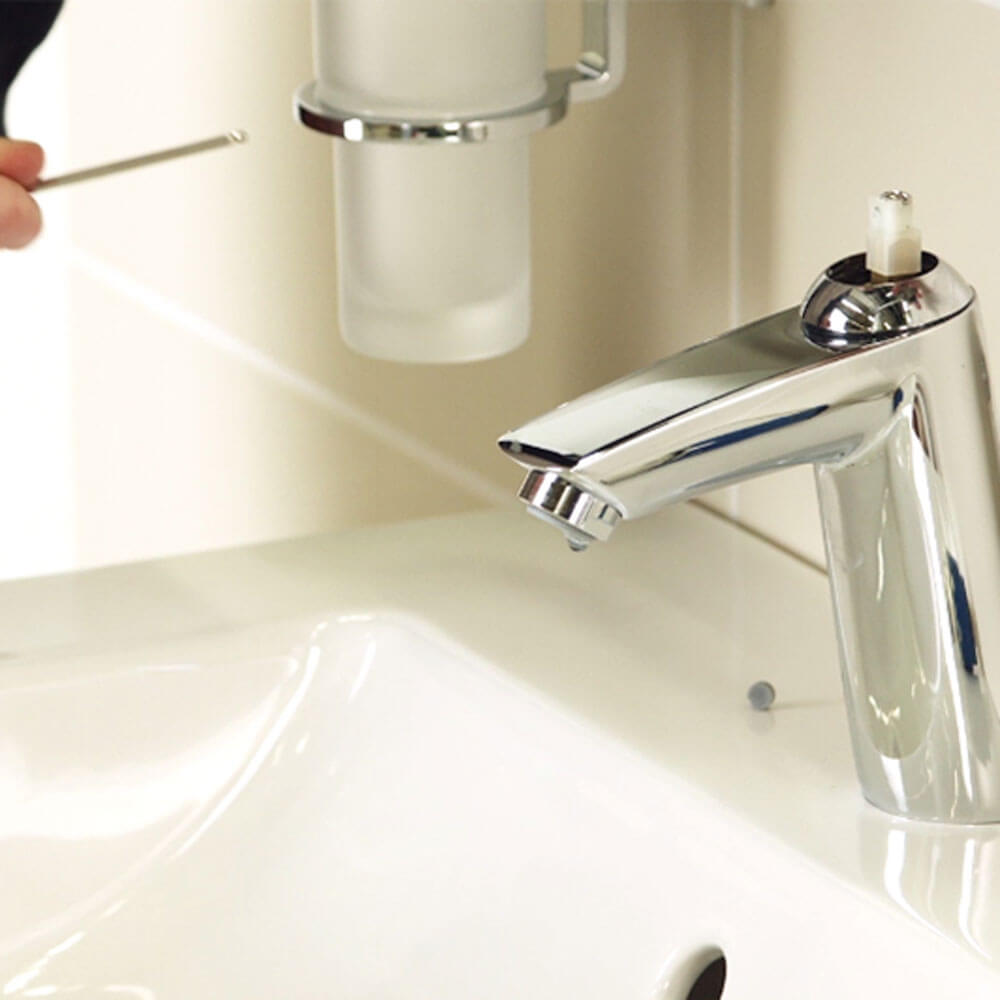
Connecting the plumbing is the next critical step. Reconnect the water supply lines to the faucet using the flexible hoses provided, ensuring they are tightly secured to prevent leaks. Attach the P-trap to the drainpipe, connecting it to the wall drain. This step may require adjusting the length of the pipes or using additional fittings to ensure a proper fit. Once all connections are made, turn on the water supply and check for any leaks. It’s important to test both the hot and cold water to ensure everything is functioning correctly. If there are any leaks, tightening the connections or adding more plumber’s tape can usually resolve the issue.
Finally, finishing touches and cleanup will complete the installation. Apply a bead of silicone sealant around the base of the sink where it meets the wall or countertop to prevent water from seeping underneath. Smooth the sealant with a wet finger or a sealant tool for a clean finish. Allow the sealant to dry according to the manufacturer’s instructions before using the sink. Clean up any debris or excess materials, and dispose of the old sink and packaging properly. With these steps completed, your new bathroom sink should be fully functional and ready to use, enhancing both the utility and appearance of your bathroom. This careful and methodical approach ensures a successful installation and long-lasting performance of your new bathroom sink.

Bathroom sink plumbing installation

American Standard Murro Wall Hung Bathroom Sink with 4 in. Faucet

DIY Installation Guide for Your Bathroom with a New Vessel Sink

Easy Steps to Replace/Install a Bathroom Sink

Rectangular Undermount Bathroom Sink with Overflow
TOTO LT241G#01 Supreme 23 in. Wall-Mount Bathroom Sink with Single

How to Install a Bathroom Sink Wayfair

Installation guides GROHE
Installation Instructions for Veneto Bathroom Faucet
Homeowneru0027s Guide To Bathroom Sink Dimensions and Sizes The

Bathroom sink installation guide – Ideas by Mr Right
Related articles:
- Bathroom Sink Cabinets Modern
- Rustic Bathroom Sink Ideas
- Bathroom Sink Storage Ideas
- Farmhouse Bathroom Sink Ideas
- Bathroom Sinks Blue
- Bathroom Sink 400mm
- Ada Bathroom Sink Dimensions
- Bathroom Sink Marble Countertop
- Bathroom Sink Design Ideas
- Bathroom Sink Pipe Leak Repair
Bathroom Sink Installation Guide
Bathroom sink installation is a common DIY task that homeowners can do themselves with some basic tools and knowledge. Installing a bathroom sink involves several steps, including removing the old sink, preparing the plumbing, mounting the new sink, and connecting the water supply. In this article, we will provide a detailed guide on how to install a bathroom sink.
Step 1: Removing the Old Sink
The first step in installing a bathroom sink is to remove the old one. This involves shutting off the water supply and disconnecting the drain and water supply lines. Follow these steps to remove an old sink:
1. Turn off the water supply by turning the shut-off valves under the sink clockwise.
2. Disconnect the drain line by loosening the nuts that hold it in place using pliers or a wrench.
3. Disconnect the water supply lines by unscrewing them from the shut-off valves using adjustable pliers.
4. Remove any mounting clips or screws that are holding the sink in place.
5. Carefully lift the old sink out of its position and set it aside.
FAQs:
Q: Can I reuse my old drain line when installing a new sink?
A: It is recommended to replace your drain line when installing a new sink as old drain lines may be corroded or damaged, which can cause leaks.
Q: Do I need to shut off the main water supply when removing an old sink?
A: No, you only need to shut off the water supply under the sink by turning the shut-off valves clockwise.
Step 2: Preparing the Plumbing
After removing the old sink, you need to prepare the plumbing for installing a new one. This involves cleaning any debris or residue left behind from the old sink and making sure that all parts are in good condition. Follow these steps to prepare your plumbing:
1. Clean any debris or residue left behind from the old sink using a cleaning solution and a cloth.
2. Inspect the drain line and make sure it is in good condition. Replace it if necessary.
3. Inspect the water supply lines and check for any leaks or damage. Replace them if necessary.
4. Install any mounting hardware that came with your new sink, such as clips or screws.
FAQs:
Q: Do I need to use plumber’s putty when installing a bathroom sink?
A: Plumber’s putty is not always necessary when installing a bathroom sink, but it can be used to seal the sink to the countertop and prevent leaks.
Q: How do I know if my water supply lines need to be replaced?
A: You should inspect your water supply lines for any leaks or damage. If they are old or corroded, it is recommended to replace them before installing a new sink.
Step 3: Mounting the New Sink
Once you have prepared the plumbing, you can mount your new sink in place. This involves attaching the mounting hardware to the sink and securing it to the countertop. Follow these steps to mount your new sink:
1. Place the mounting clips or screws onto the underside of your new sink according to the manufacturer’s instructions.
2. Carefully place the sink into position on top of the countertop.
3. Tighten the mounting clips or screws using pliers or a screwdriver until the sink is securely in place.
4. Apply plumber’s putty around the edge of the sink to seal it to the countertop and prevent leaks.
FAQs:
Q: Can I install a bathroom sink without mounting hardware?
A: It is not recommended to install a bathroom sink without proper mounting hardware as this can cause instability and potential leaks.
Q: How tight should I tighten the mounting clips or screws?
A: You should tighten them enough so that they hold the sink securely in place but not too tight that they crack the sink or damage the countertop.
Step 4: Connecting the Water Supply
The final step in installing a bathroom sink is to connect the water supply lines. This involves attaching the supply lines to the shut-off valves and to the faucet on the sink. Follow these steps to connect your water supply:
1. Attach one end of the water supply lines to the shut-off valves using adjustable pliers.
2. Attach the other end of the water supply lines to the faucet on the sink using adjustable pliers.
3. Turn on the water supply by turning the shut-off valves counterclockwise.
4. Check for any leaks And tighten any connections if necessary.
FAQs:
Q: Can I use Teflon tape instead of plumber’s putty for the water supply connections?
A: Yes, Teflon tape can be used to seal the water supply connections and prevent leaks.
Q: How do I know if there is a leak in my plumbing after installing a new sink?
A: You can check for leaks by turning on the water supply and inspecting all connections. Look for any dripping water or damp areas around the plumbing. If you notice a leak, tighten the affected connection or call a professional for assistance.
Congratulations, you have successfully installed a new bathroom sink! Remember to take your time and follow these steps carefully to ensure a successful installation and prevent any potential leaks or damage.