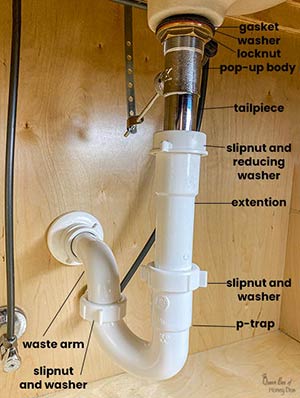
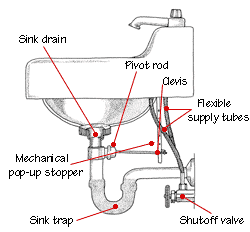
Understanding the plumbing beneath your bathroom sink is essential for both homeowners and DIY enthusiasts alike. A comprehensive diagram of bathroom sink plumbing can shed light on the intricate network of pipes and connections responsible for the proper functioning of your sink. The diagram typically includes key components such as the sink drain, trap, tailpiece, and the various pipes that connect them. The sink drain is a crucial element, serving as the exit point for used water. It is connected to the trap, a curved section of pipe that prevents sewer gases from entering your home while allowing water to flow freely.

The tailpiece, extending vertically from the sink drain, connects to the main drain line, directing wastewater away from the sink and into the larger plumbing system. Understanding the configuration of these components is vital for troubleshooting common issues like clogs or leaks. Moreover, having a clear diagram of bathroom sink plumbing can empower homeowners to tackle minor repairs or installations confidently. It provides a visual guide for identifying and locating specific components, making it easier to follow step-by-step instructions for maintenance tasks.
In recent years, there has been a growing interest in eco-friendly plumbing solutions, and this extends to bathroom sink plumbing. Some diagrams may include additional features such as a P-trap with a clean-out plug, which facilitates easier access for clearing clogs. Additionally, innovations like water-saving faucets and aerators are often integrated into modern plumbing systems. A well-designed diagram not only illustrates the basic components but also allows for the inclusion of these environmentally conscious features. Whether you’re a homeowner looking to understand your plumbing system or a DIY enthusiast embarking on a bathroom renovation project, a comprehensive diagram of bathroom sink plumbing serves as a valuable tool for navigating the intricacies of this essential home infrastructure.
Images Related to Diagram Of Bathroom Sink Plumbing
Bathroom Sink Plumbing
As with the pedestal, this particular sink contains virtually no storage facility so you will need to combine it with a storage bin or perhaps racks below or even mirrored cabinet above to meet the have. This’s once the countertop and sink are created with one constant material, most often sound surfacing, metal, stone or concrete.
20 Bathroom Sink Drain Parts: How They Works?
Bathroom Sink Plumbing Diagram DIY Pinterest Sinks Bathroom sink

Following the sink is set and dried you can do your drain as well as rain hook-ups. You will need to obtain an understanding regarding the different kinds of bathroom sinks that can be found, mainly because there are many available, as well as the advantages differ among all the different models and types of bathroom sinks.
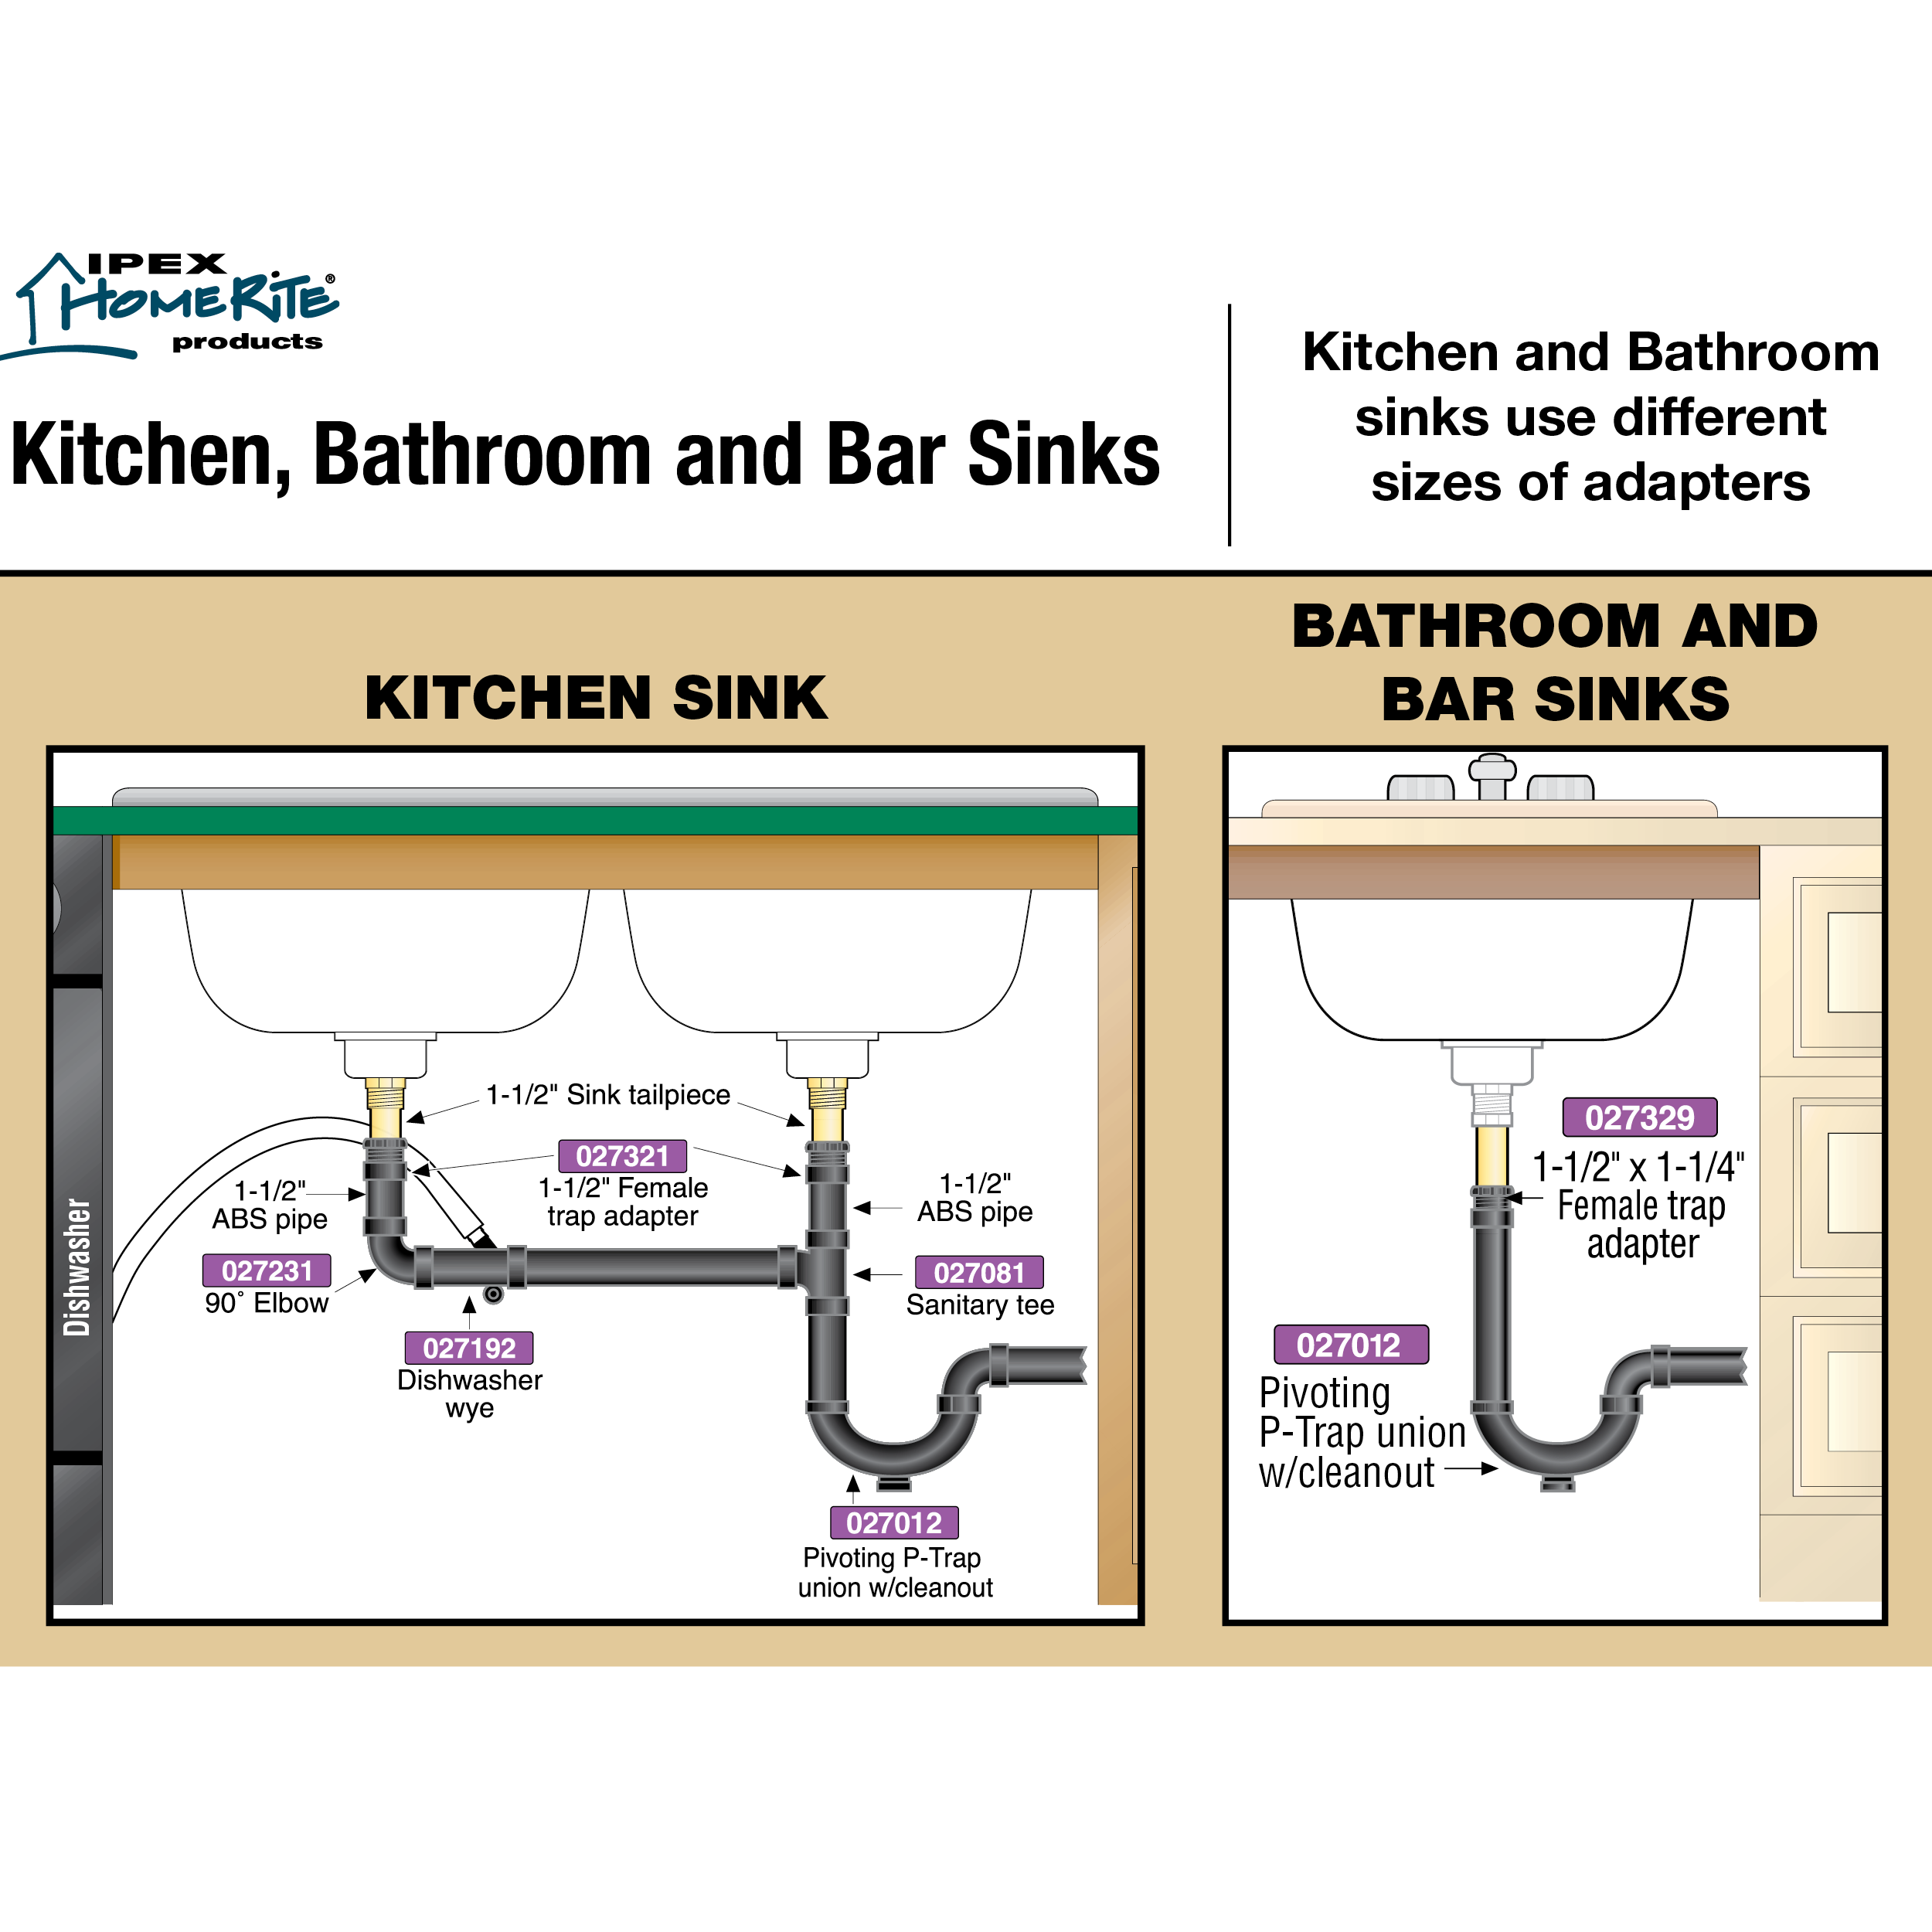
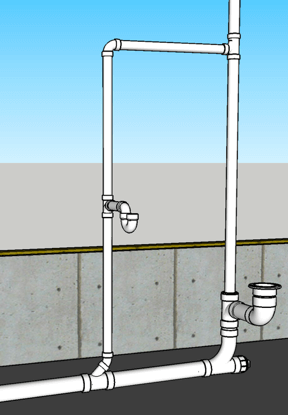
Kitchen, bathroom, and bar sink drainage
How To Plumb a Bathroom (with multiple plumbing diagrams
Bathroom Sink Drain Parts: Diagrams and Installation – Plumbing Sniper
Parts of a Sink

Types of Plumbing Traps and How They Work – BestLife52

Plumbing Codes and Stuff u2014 randomsudoisms: toilet and sink vent
Types of Plumbing Traps and How They Work – BestLife52

Related articles:
- Bathroom Sink Cabinets Modern
- Rustic Bathroom Sink Ideas
- Bathroom Sink Storage Ideas
- Farmhouse Bathroom Sink Ideas
- Bathroom Sinks Blue
- Bathroom Sink 400mm
- Ada Bathroom Sink Dimensions
- Bathroom Sink Marble Countertop
- Bathroom Sink Design Ideas
- Bathroom Sink Pipe Leak Repair
Introduction
Bathroom sinks are essential plumbing fixtures in any home. They provide a place for washing hands and other items, and they help keep the bathroom clean. Knowing how to properly install them is important, and understanding the diagram of bathroom sink plumbing is key to success. This article will explain the different parts of a bathroom sink plumbing system and offer tips on how to install it correctly. Additionally, this article will answer some frequently asked questions related to bathroom sink plumbing.
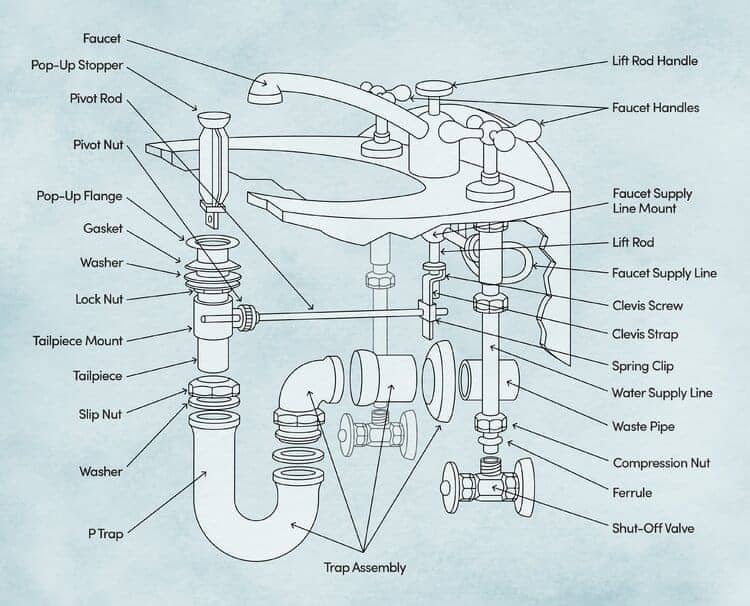
Overview of Bathroom Sink Plumbing Components
A bathroom sink plumbing system consists of several components that work together to provide water to the sink. The main components are: supply lines, shutoff valves, drain pipes, trap assemblies, and fittings. Here is an overview of each component and its purpose in the system:
Supply Lines
The supply lines provide the water from the main water line or from individual hot and cold valves to the faucet. They are usually made of copper or flexible plastic tubing and connect directly to the valves. The number and length of supply lines required will depend on the type of faucet you have installed.
Shutoff Valves
The shutoff valves are used to control the flow of water to the faucet. They are typically located directly behind the faucet and must be turned off before beginning any maintenance or installation work on the system. It is important to check for leaks at these valves after installation is complete.
Drain Pipes
The drain pipes are used to carry wastewater from the sink down into the sewer or septic system. They come in two varieties: PVC pipes or flexible drain lines with trap assemblies. The PVC pipe requires glue for installation while flexible drain lines can be connected with compression fittings without glue. It is important to use new drain pipes that match your existing setup in order for them to fit properly.
Trap Assemblies
A trap assembly is a curved piece of pipe that connects the drain line and prevents sewer gases from entering your home through the sink’s drain opening. It also prevents small objects such as jewelry from entering into your plumbing system. Trap assemblies come in a variety of sizes and must be selected based on your specific needs.
Fittings
Fittings are used to connect all of these components together securely so that they do not leak or become disconnected during use. Common types of fittings include couplings, tees, elbows, unions, etc., depending on what type of pipe you are using in your system. It is important to select quality fittings that are rated for use with your specific type of pipe in order for them to work properly.
Installing a Bathroom Sink Plumbing System
Installing a bathroom sink plumbing system requires certain tools and knowledge about how it should be done correctly. Before you begin, make sure that all necessary components (supply lines, shutoff valves, drain pipes, trap assemblies, fittings) are present and that everything fits together properly according to your diagram of bathroom sink plumbing setup. Next, turn off both hot and cold water supply lines at the main shut-off valve before starting any installation work on your system. After that, you can begin connecting all components together according to your diagram while making sure everything fits snugly together without any major gaps between pieces or loose connections anywhere along the line. Lastly, test your system by turning back on both hot and cold water supply lines at their respective shut-off valves before turning on the faucet for use – if there are no leaks present then congratulations! You have successfully installed a bathroom sink plumbing system!
FAQs About Bathroom Sink Plumbing Systems
Q1: What type of pipe should I use for my bathroom sink plumbing?
A1: Generally speaking, PVC piping is best for most situations as it is easy to work with and relatively inexpensive compared to other types of piping materials like copper or stainless steel piping systems. However if you need flexibility in your setup then flexible drain lines may be preferable as they can be easily manipulated into custom shapes when needed but they can also be more expensive than PVC piping systems so it’s important to weigh out all Of your options before making a decision.
Q2: How do I know if my bathroom sink plumbing system is correctly installed?
A2: The best way to tell is by performing a leak test after all components have been connected together. To do this, turn on both hot and cold water supply valves at their respective shut-off valves before turning on the faucet. If no leaks are present, then you can be sure that your system has been successfully installed.
What is the average size of a bathroom sink plumbing diagram?
The average size of a bathroom sink plumbing diagram is typically 8.5 x 11 inches.