Repairing a Peerless bathroom faucet can be a cost-effective and practical solution for addressing common issues such as leaks or dripping. Before starting the repair process, it’s essential to gather the necessary tools, including an adjustable wrench, plumber’s tape, and replacement parts if needed. The following steps provide a comprehensive guide on how to repair a Peerless bathroom faucet.
Identify the Issue: Begin by determining the specific problem with the Peerless bathroom faucet. Common issues include leaks around the base of the spout, dripping from the spout itself, or difficulty in turning the handles. Identifying the problem is crucial for selecting the appropriate repair method.

Turn Off the Water Supply: Before starting any repairs, it’s essential to turn off the water supply to the faucet. Locate the shutoff valves beneath the sink and close them to prevent water flow. This step ensures a safe working environment and minimizes the risk of water damage during the repair process.
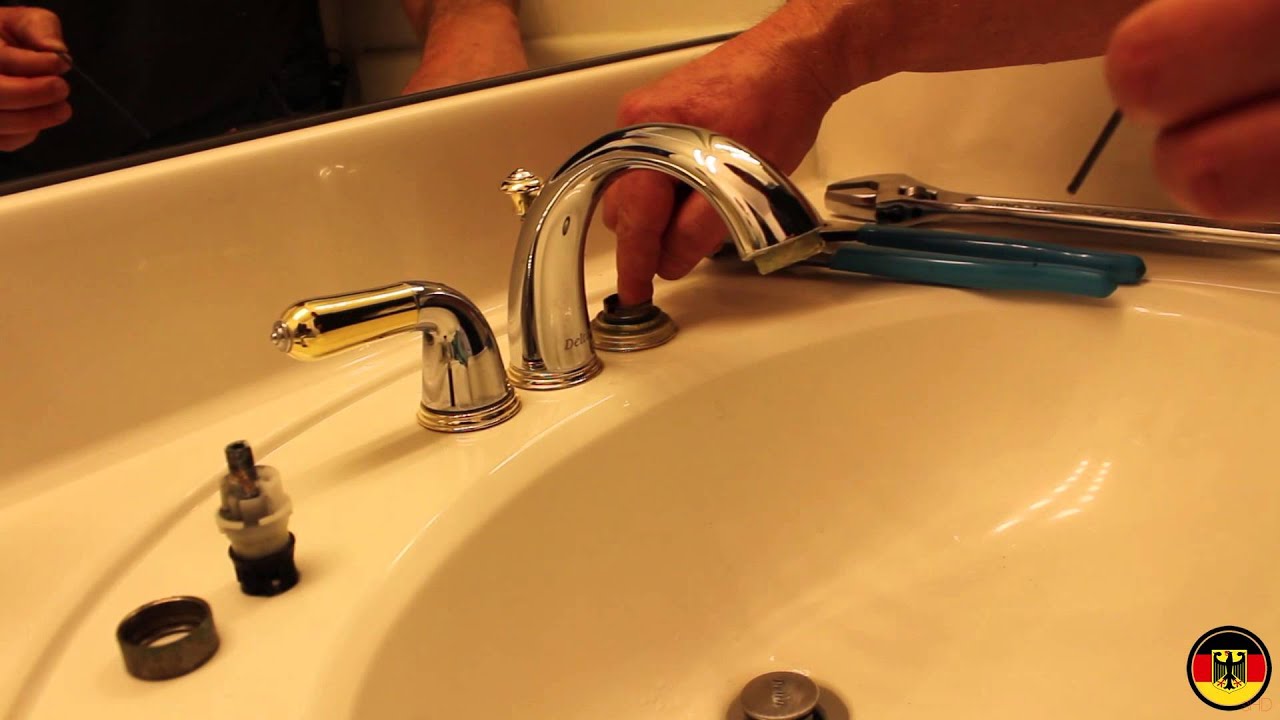
Disassemble the Faucet: Use an adjustable wrench to remove the handles and other components of the Peerless bathroom faucet. Depending on the model, this may involve removing a cap, set screw, or handle assembly. Once disassembled, inspect the internal components for any visible damage or wear.
Replace Faulty Components: If the issue is evident upon inspection, such as a damaged O-ring, worn-out cartridge, or corroded valve seat, replace the faulty components. Peerless faucets often come with lifetime warranties, and contacting the manufacturer for replacement parts may be an option. Apply plumber’s tape to the threads of any new components for a secure and watertight seal.
Reassemble and Test: After replacing the necessary components, carefully reassemble the faucet in the reverse order of disassembly. Tighten all connections securely, ensuring that there are no loose parts. Turn on the water supply and test the faucet to check for leaks or other issues. If the repair was successful, the faucet should operate smoothly without any leaks.
repairing a Peerless bathroom faucet involves a systematic approach of identifying the issue, turning off the water supply, disassembling the faucet, replacing faulty components, and testing the repaired faucet. While some repairs may require basic plumbing skills, many homeowners can successfully address common faucet issues with the right tools and guidance. Regular maintenance and prompt repairs not only extend the lifespan of the faucet but also contribute to water conservation and prevent potential water damage in the bathroom
Leaks
Leaks
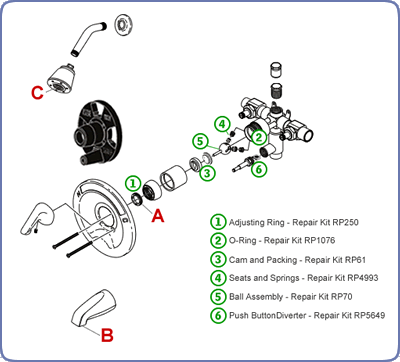
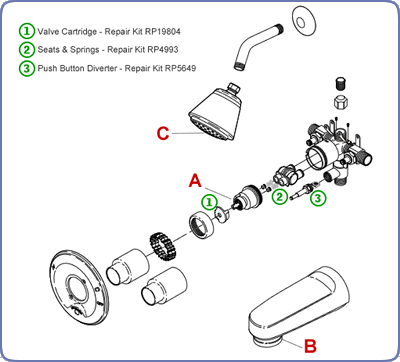
Delta/Peerless Faucet Cartridge Installation
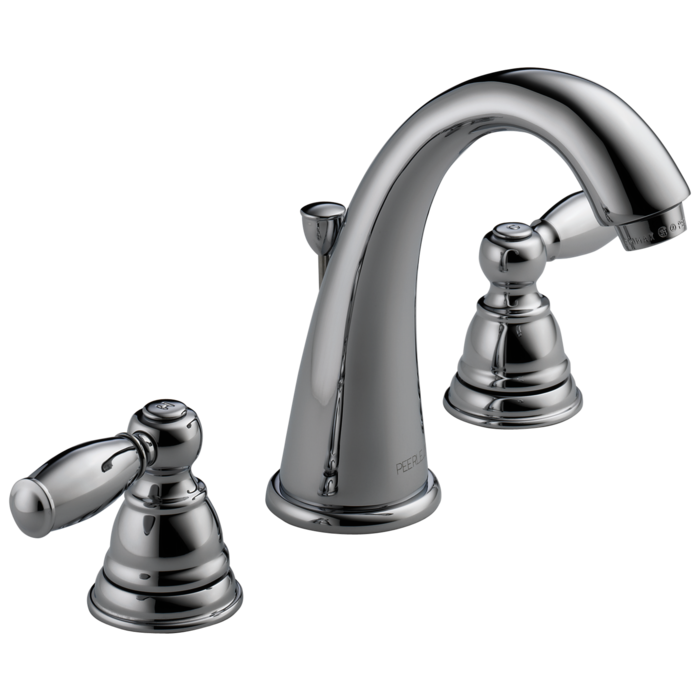
Peerless Apex Brushed Nickel 2-Handle 4-in centerset WaterSense Bathroom Sink Faucet with Drain with Deck Plate

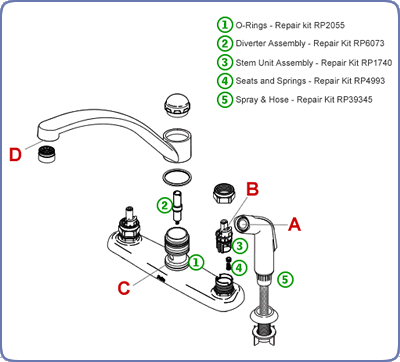
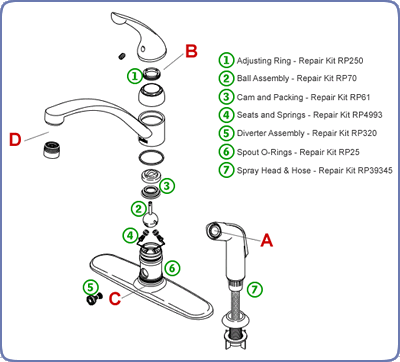
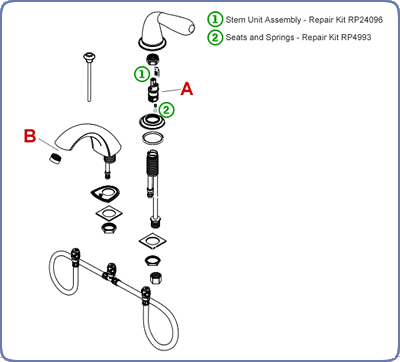
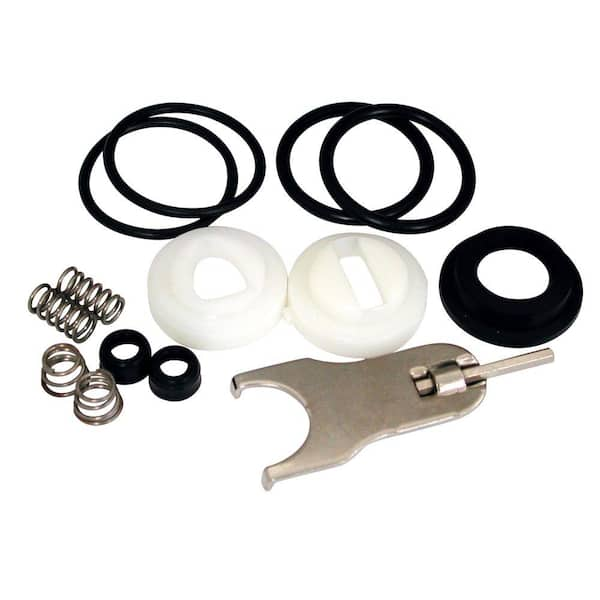
Repair Kit for Delta and Peerless Faucets
Peerless – Double Handle – Centerset Bathroom Faucets – Bathroom
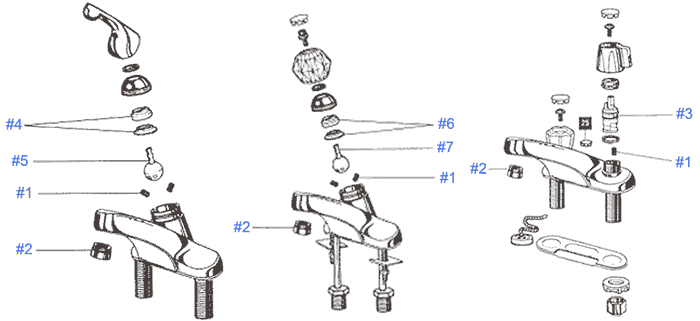
PEERLESS brand faucet repair parts
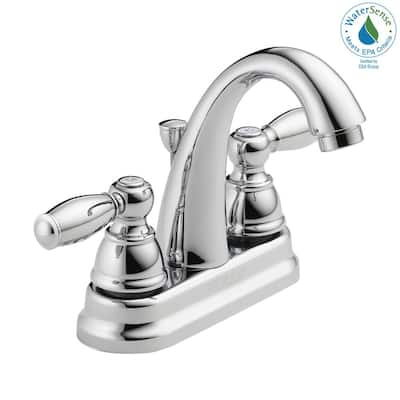
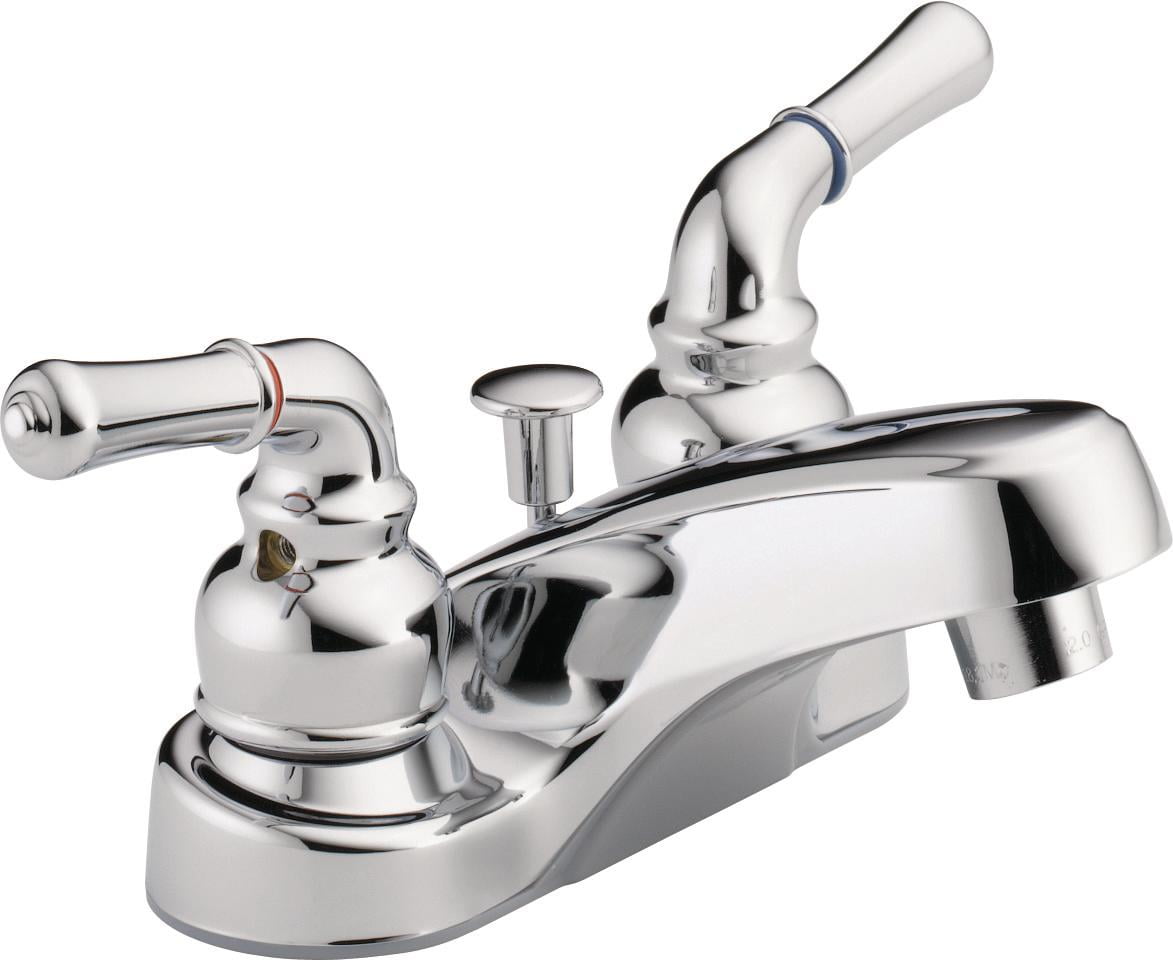
Peerless Choice Centerset Two Handle Bathroom Faucet in Chrome
Peerless Claymore Centerset Bathroom Faucet Brushed Nickel, Bathroom Sink Faucet, Drain Assembly, Brushed Nickel P299685LF-BN

Peerless Chrome Claymore Two Handle Bathroom Faucet
Related articles:
- Old Fashioned Looking Bathroom Faucets
- Black Finish Bathroom Faucets
- Replace Valve Stem Bathroom Faucet
- 2 Tone Bathroom Faucets
- How To Fix A Leaky Moen Single Handle Bathroom Faucet
- Black Waterfall Bathroom Faucet
- Delta Mandara Bathroom Faucet
- Antique Brass Bathroom Faucets Single Handle
- Bathroom Faucet Installation Guide
- Crane Bathroom Faucet Parts
How To Repair A Peerless Bathroom Faucet
If you’re looking to repair a Peerless bathroom faucet, then you’ve come to the right place. This article will walk you through the process of repairing a Peerless bathroom faucet and provide some helpful tips and tricks for making it easier. We’ll also include some commonly asked questions about Peerless bathroom faucets and their repair.
Identifying The Problem
The first step in repairing a Peerless bathroom faucet is identifying the problem. Common problems include leaking from the spout or handle, difficulty controlling water temperature or flow, and dripping from the spout. If you can’t identify the problem, then you should consider calling in a professional plumber to help diagnose and fix the issue.
Gathering The Tools And Supplies
Once you know what the problem is, it’s time to gather the tools and supplies needed for the repair. This will vary depending on the type of repair being done, but typically you’ll need a wrench or pliers, a screwdriver, some type of cleaning solution (such as vinegar or baking soda), lubricant (such as petroleum jelly), and replacement parts (if necessary). Make sure to have all of these items ready before starting your repair.
Disassembling The Faucet
Once you have all of your tools and supplies ready, it’s time to disassemble the faucet. Start by turning off the water supply to your bathroom sink. Then remove any screws or bolts that are holding the handle or spout in place. Once those are removed, carefully pull off both pieces of the faucet and set them aside for cleaning.
Cleaning And Inspecting The Parts
Next, thoroughly clean all parts of the faucet with a soft cloth dampened with your chosen cleaning solution. Pay special attention to any areas where mineral deposits may have built up over time, such as around the handle stem or inside the spout. After cleaning each part, inspect it for any visible damage or wear-and-tear that could be causing your problem. If everything looks good so far, then move on to lubrication and reassembly.
Lubricating And Reassembling The Parts
Now it’s time to lubricate any moving parts with petroleum jelly or similar lubricant before reassembling them. This will help reduce friction between components and make it easier for them to move freely when in use. Once everything has been lubricated, begin reassembling in reverse order—starting with attaching the spout back onto the sink first before adding any other parts or pieces. Make sure everything is secure before proceeding further.
Testing The Repairs
Do I need any special tools for repairing a Peerless bathroom faucet?
Typically no—all you need is a wrench or pliers, screwdriver, cleaning solution, lubricant (like petroleum jelly), and possibly some replacement parts if necessary. However, depending on what type of repair is being done, more specialized tools may be required in certain cases. It’s best to check with your local plumbing supply store if you’re unsure about what kind of tools are needed for your specific situation.
How often should I clean my Peerless bathroom faucet?
It’s recommended that you clean your Peerless bathroom faucet at least once every few months using a mild detergent solution and soft cloth to avoid buildup of dirt and grime over time which can lead to problems with its performance down the line. You should also inspect all moving parts regularly for signs of wear-and-tear or damage that might need repairs sooner rather than later.
What kind of lubricant should I use when reassembling my Peerless bathroom faucet?
Petroleum jelly is typically best for this purpose as it won’t harm any rubber seals in your faucet while providing enough lubrication for components to move freely when in use. However , you can also use a lubricant specifically designed for plumbing fixtures if you prefer.
What tools are needed to repair a Peerless bathroom faucet?
Tools needed to repair a Peerless bathroom faucet include: adjustable or basin wrench, slip-joint pliers, Phillips screwdriver, and flat-head screwdriver. You may also need cleaning supplies and lubricant, depending on the type of repair needed. Replacement parts may also be needed if the faucet is damaged beyond repair.
What type of wrench is needed to repair a Peerless bathroom faucet?
A 7/16 inch hex wrench or an adjustable wrench should be used to repair a Peerless bathroom faucet. For more intricate repairs, it may be necessary to use a basin wrench or slip-joint pliers.
What tools are required to repair a Peerless bathroom faucet?
To repair a Peerless bathroom faucet, you will need a set of slip-joint pliers and a Phillips head screwdriver. You may also need an adjustable wrench to remove the faucet handles. Additionally, you may need replacement parts such as O-rings and washers that can be purchased from your local hardware store.