Repairing a Price Pfister bathroom faucet involves a systematic approach to address common issues such as leaks, dripping, or reduced water flow. One of the first steps is to turn off the water supply to the faucet. For a leaking faucet, often caused by a worn-out cartridge, disassemble the fixture by removing the handle and escutcheon. Inspect the cartridge for any signs of damage or deterioration and replace it if necessary. Price Pfister is known for its durable cartridges, but over time, wear and tear can occur. A careful replacement ensures a watertight seal and restores the faucet’s functionality.

If the issue is reduced water flow or a dripping faucet, the aerator may be the culprit. Unscrew the aerator from the spout and clean it thoroughly to remove any mineral deposits or debris. Soaking it in a vinegar solution can help dissolve stubborn buildups. Additionally, check the water supply lines for any blockages or kinks that might be impeding water flow. Regular maintenance, including cleaning the aerator and checking for obstructions in the water supply lines, is essential to keep your Price Pfister bathroom faucet in optimal condition.

In addition to specific repairs, understanding the warranty and reaching out to Price Pfister’s customer support can provide valuable assistance and guidance. Being aware of the warranty coverage and any available replacement parts ensures that your repairs align with the manufacturer’s recommendations. Overall, by combining DIY repair skills with routine maintenance, you can extend the life of your Price Pfister bathroom faucet and enjoy a reliable and stylish fixture in your home
Images Related to How To Repair Price Pfister Bathroom Faucet
Troubleshooting Issues About Your Faucet Pfister Faucets
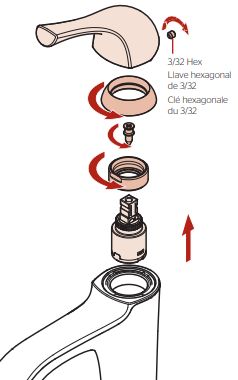
What is a Faucet Cartridge? Dripping Price Pfister Faucet, Cartridge Replacement in 15min How to.

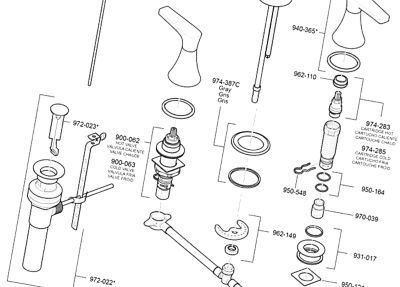
Price Pfister Bathroom Sink Faucet Repair

Bathroom – My Single Handle Bathroom Faucet is Leaking or Dripping
Bathroom – Faucet is Leaking or Dripping
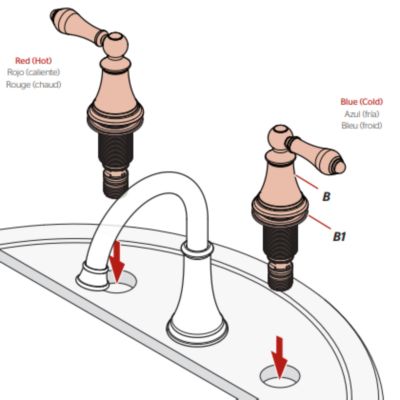
How To Disassemble A Price Pfister Bathroom Faucet – Bargain Bathroom

Related articles:
- Black Finish Bathroom Faucets
- Replace Valve Stem Bathroom Faucet
- 2 Tone Bathroom Faucets
- How To Fix A Leaky Moen Single Handle Bathroom Faucet
- Black Waterfall Bathroom Faucet
- Delta Mandara Bathroom Faucet
- Antique Brass Bathroom Faucets Single Handle
- Bathroom Faucet Installation Guide
- Crane Bathroom Faucet Parts
- Jado Bathroom Faucet Replacement Parts
How To Repair Price Pfister Bathroom Faucet
Price Pfister bathroom faucets are known for their high-quality and durable design. However, like any other plumbing fixture, Price Pfister faucets can experience wear and tear over time. Fortunately, repairing a Price Pfister bathroom faucet is not as difficult as it might seem. With the right tools and a bit of DIY knowledge, you can repair your Price Pfister faucet in no time.
Tools & Supplies Needed
Before you begin the repair process, make sure that you have all of the necessary tools and supplies on hand. You will need a screwdriver, adjustable wrench, pliers, replacement parts (if necessary), lubricant, and water supply line. Additionally, you will need to know the type of Price Pfister faucet that you are attempting to repair.
Steps To Repairing A Price Pfister Bathroom Faucet
Once you have gathered the necessary tools and supplies, it’s time to begin the repair process. Here is a step-by-step guide to help you get started:
Step 1: Shut off the Water Supply
The first step in repairing a Price Pfister bathroom faucet is to shut off the water supply. This is done by turning off the shutoff valves located beneath your sink or behind your toilet. It is important to make sure that all of the water has been completely turned off before continuing with the repair process.
Step 2: Remove Faucet Handle
Next, you will want to remove the faucet handle(s). This can be done with a screwdriver or an adjustable wrench. Once you have removed the handle(s), set them aside and inspect them for any damage or corrosion. If there is any visible damage, it may be necessary to replace them before continuing with the repair process.
Step 3: Unscrew The Faucet Base
Once the handle(s) have been removed, use an adjustable wrench to unscrew the faucet base from its mounting bracket. This will allow you to access the interior parts of your faucet for inspection or replacement. Be sure to set aside all screws during this step so that they can be reattached later on in the repair process.
Step 4: Inspect Interior Parts
Now that you have access to the interior parts of your faucet, inspect them for any signs of damage or corrosion. If any damaged parts such as washers or gaskets need to be replaced, make sure that you have purchased replacements before continuing with the repair process. Also, make sure to apply some lubricant (such as WD-40) onto any moving parts before reassembly; this will help ensure smooth operation of your faucet once it has been repaired.
Step 5: Reassemble Your Faucet
Now that all damaged or corroded parts have been replaced (or inspected), it’s time to begin reassembling your faucet. Make sure that all parts are properly secured before reattaching them to their respective mounting points. Additionally, don’t forget to reattach your water supply lines before testing out your newly repaired faucet!
Step 6: Test Out Your Repaired Faucet
Now that your faucet has been reassembled and secured in place, it’s time to test it out! Turn on both hot and cold water supplies and check for any leaks around joints or other areas around your sink/toilet area. If there are no leaks present then congratulations – you have completed repairs on your Price Pfister bathroom faucet!
FAQs About Repairing A Price Pfister Bathroom Faucet
What type of tools do I need when repairing a Price Pfister bathroom faucet?
A: When repairing a Price Pfister bathroom faucet, you will need a screwdriver, adjustable wrench , pliers, replacement parts (if necessary), lubricant, and water supply line. Additionally, you will need to know the type of Price Pfister faucet that you are attempting to repair.
What type of damage can I expect to see when inspecting my Price Pfister bathroom faucet?
When inspecting your Price Pfister bathroom faucet, you may find signs of corrosion or wear and tear on parts such as washers, gaskets, or other interior components. Additionally, you may find that the handle(s) or other exterior parts have become damaged over time.
How do you replace a Price Pfister bathroom faucet cartridge?
- Shut off water supply to the faucet.
- Remove the handle by unscrewing the handle screw and pulling off the handle.
- Unscrew the bonnet nut with a wrench or pliers, then pull out the cartridge.
- Install the new cartridge by lining up the tabs on the side with the slots in the housing and pushing it in until it is firmly seated.
- Replace the bonnet nut and tighten with a wrench or pliers.
- Re-attach the handle, making sure it is secure.
- Turn on water supply and check for leaks.
What tools do I need to replace a Price Pfister bathroom faucet cartridge?
To replace a Price Pfister bathroom faucet cartridge, you will need: a basin wrench, adjustable pliers, a flathead screwdriver, and a Phillips head screwdriver.